Pages

Saturday, August 20, 2016

Make Your Own Ribbon Bulletin Board

This post is nothing new, but maybe it will still give you an idea.

I get three fashion magazines that come to my house. I guess I'm old school and like to see trends and fashion ideas in actual print vs. having a Pinterest board (which. . .yes. . .I have some of those too). Anyways, I used to clip out my favorite ideas and keep them in a 3-ring notebook. Well. . .the main problem with that is that I never look at it! It stays tucked away on its shelf out of sight. That doesn't really help me. I realized that I need something more immediate. I needed a bulletin board.

Before I even started pricing cork boards and push pins, I realized that I had all the materials to make a ribbon bulletin board. Why go out and buy something that I could just make? That's what this post is going to show you: How to make your own ribbon bulletin board.

First of all, I had this old canvas frame that wasn't being used. You don't have to have one covered in canvas. (But let's face it. If you are female and have friends, chances are you have been to one of those group painting classes and you probably have an outcome of that event at home right now that you HATE, so. . .why not repurpose it?) :) It just needs to be made of wood so you can push staples into it--you could probably also use a decent piece of cardboard. I also grabbed a piece of shiny pink table cloth to cover it, but you can use any fabric. (You may remember that I used this same fabric to make a sewing machine cover.)


I laid the fabric down and cut around it leaving about two to three inches around. That would give me just enough to fold up around the frame.


Then I spayed some adhesive to the back of the fabric. You don't have to do this part, but it helps to keep the fabric from slipping as you attach it to the frame.


Then I folded up the edges of the fabric around the frame.


Okay, I would advise you if you do this to use a staple gun or AT LEAST a normal sized stapler. All we have in our house is this tiny Swingline stapler, and. . .it took a while because about only one in five staples actually took!


This is after all the fabric had been stapled up around the frame.


Next I took some ribbon and diagonally stretched it across the frame. I stapled either end to the frame.


After stapling the ribbon to the sides, I pulled and stapled the tail parts around to the back.

And that's basically it. You just keep adding ribbon in rows until you are satisfied with how it looks.


Be sure to go back the other direction.


Almost finished. I'm pretty proud of how good it looks as I didn't measure distances or anything. Not bad for eyeballing and using an almost worthless stapler!


This is the back. You can see I stapled all the ribbon tails to the back.


The last step was to add buttons to each intersection of ribbon. This just keeps the pictures in place that you tuck into the ribbon.


All done!

Well. . .almost.


Now it's on the wall, and I can easily see inspiring ideas. 
(Right now I'm into collars.)
My plan is that once this is filled up, I can take a picture of it and put that into an archive of sorts, take these down, and start a new board. I plan on doing this twice a year or so. Anyways, we'll see. For now, I like being able to see my ideas easily!


And then the obligatory social media question:

What do you/will you use your bulletin board for?

The End!


Friday, August 19, 2016

Refashioning: Oversized Shirt into Separates - Shirt and Skirt (V Shaped Body Type to Pear Shaped Fix)

I got this shirt in Thailand for around $1.60. I just liked the cartoon print of it and knew I could do something with it.

Actually, at this point, I've already taken in the back neckline to bring the shoulders closer together. It used to be a huge scoop neckline. Also, the sleeves were way too big for my arms. Obviously, it was made for someone who had much broader shoulder and thicker arms--maybe a ladyboy? Who knows. Anyways, this sistah is pear shaped, so. . .I thought if I took in the neckline and sleeves, the problem would be fixed, but as you can see, I'm still not gonna wear it!


Another problem is that this shirt was just so far over the top, and what I call "Miami Chic" meaning "cheap and tacky." I feel like I should be wearing a ton of gold chains and hoop earrings with stilettos, and. . .that ain't my style.


Here you can see how I took in the back neckline.


All right, so if I was going to save this shirt, I was going to need to spread the love a little bit. So I cut it in half.


Using some black jersey, I cut out a three inch waist band for the top of the bottom of the shirt. 
It was about to become a skirt.


Then I cut out a 9 inch band of jersey to put on the bottom of the top of the shirt.


Here is the skirt band.


I finally found a bodkin! So...here I am using my bodkin to thread some elastic through the waistband.


Then, I stitched the elastic together and sewed the rest of the waistband seam to close the hole.


Skirt.


Here is the band going on the bottom of the top of the shirt.


Finished.

Okay, so...yes, there is still a lot going on, but at least now I can wear the pieces separately and not look as gross. Even just adding the wide black waist section breaks up the craziness a bit, if I wanted to wear them together. Adding the waistbands has now added shape to an otherwise shapeless garment. I may actually get rid of this entire outfit soon, but I wanted at least to show you how you could salvage and elevate some of those oversized T-shirts you may currently be wearing as pajamas!


The End!


Wednesday, August 17, 2016

How to Fix Permanent Stains on a Garment

My sis took me to a new thrift store where everything in the store is $.25 on Wednesdays. I bought this neon yellow hoodie there. I almost didn't because if you look closely, there are permanent black ink stains on it, but then I was like, "You know what? For $.25, I can fix it!"


Here is a closeup of the problem. Because I couldn't take the stains out, I would have to cover them up.


I got some lace and threw it on top.


Then, I cut around the patterns in the lace so that it covered all the spots and pinned it down as I cut.


Then I zig-zag stitched all around the outside of the lace.


Then I sewed back and forth over top of the lace to make sure it didn't pull away from the shirt.


This is what the back of my stitching looks like (in case my explanations didn't make sense).


The finished shirt. To me, it looks really modern as "Athleisure" wear and mixing prints and textures are popular these days. I could also have embroidered something on it, but that would require taking the shirt apart so I could get it up under my embroidery machine. 
This was way easier. 


The End!


Monday, August 15, 2016

Sunday School Craft - Jesus Carpenter Hammer

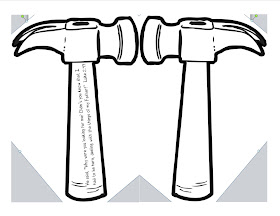
So, I make the lesson plans for all the little kids at church that are under four years old. They are split into two main rooms and usually their books coincide with the DVDs that we have, but this week, half of them are learning about Jesus being raised by a carpenter and the other half is learning about Jesus being left in the temple as a twelve-year-old. I decided to combine both lessons with this craft: A hammer (denoting the carpentry aspect...which...yes, I realize that Joseph was probably more of a mason than a modern day woodworking carpenter, but...it's gonna be okay. They can learn the more historically accurate aspects of Jesus' life when they get older.) with Luke 2:49 on the handle. Luke 2:49 is the verse where Jesus says, "Why were your looking for me? Didn't you realize I'd be here doing my Father's business?" 

For this craft, I just found a graphic of a hammer, turned it vertically, mirror reflected it and added a verse to the handle. 

For this craft you will need:

Cardstock, tongue depressors (optional), glue, and crayons.

Just cut around the hammers, glue a tongue depressor in the middle, and then glue the other side of the hamer on top. Color before or after. Done!


So...it's definitely irony that will be lost on the little ones, but hopefully someone will make the connection that Jesus had an earthly father and a Heavenly Father, and while carpentry is one father's business, things of God are the other Father's. Maybe it's too deep, but...it's what we're going with, people! If I wanted to get really deep, I could incorporate three nails...yeah...no. Feel free to use it if you need it!


The End!


Saturday, August 13, 2016

Make Your Own SPF Body Lotion!
UPDATE: This recipe I used lasted 3.5 months. It kept very well during that time.


First off, I need to explain that my recipe for body lotion is not FDA approved, and I make no claims that it will prevent skin cancer.

That said, I use two types of sun "blocking" ingredients: zinc oxide, and titanium dioxide--both in powder form. I use these because after researching, it seems that both of these ingredients are less harmful than other sunscreens out there. Anyways, I had them on hand from another project for which I bought them, so. . .into my lotion they would go.

If you want to make your own lotion, you don't have to use all the ingredients that I used. I just had them in my supply from my soap making and other little projects. Basically, if you want to make lotion, you need to have some kind of solid oil or butter and some liquid oil. Make sure to use about two to three times as much liquid as you use solid. You could even use different ingredients from what I used, so don't be afraid to experiment. Just keep in mind that if your ingredients need to be refrigerated or will likely spoil, your lotion won't hold up very long.

I am the kind of person who goes through lotion (SPF especially as I wear it every day) way too quickly, so this is why I decided to make my own. I just bought this five cup glass jar at a yard sale, so I could make lotion that would last me several weeks.

What I used: beeswax, cocoa butter, shea butter, coconut oil, grapeseed oil, avocado oil, pure aloe gel, titanium dioxide, zinc oxide, and one bottle of Bath and Body Works lotion (I'll explain why).


Whatever oils and butters you use, make sure to melt the hardest ones first. I cut up about a bar and a half of beeswax and melted it in the microwave for two minutes.


I cut up some cocoa butter and added it to the beeswax and melted it for another two minutes.


I had an already open jar of coconut oil, and I added some shea butter to it. I melted those together for about a minute.


You can see my two jars here. I forgot to mention: I wanted the jar to be big enough I could fit my hand into it. Also, I wanted it to be big enough so that I could actually make the lotion in it. This would cut down on cleaning and also cut down on product loss. The coconut oil jar I just ended up throwing away, so I didn't have to clean that one either.


Then, I added the coconut oil/shea butter to the bigger jar.


Then, using the now empty coconut oil jar, I added about 5T of zinc oxide and 5T of titanium dioxide. (I read that a good ratio for SPF is to add about 1-2T of either z.o. or t.d. to 8oz. of lotion. Since this jar is 5 cups, and 1 cup is 8oz., that is why I added 10T of the powder.)


I then filled the jar with grapeseed oil and avocado oil and stirred it up.


The jar is not quite full yet!


Okay,...this is not DIY, but I get lotion every Christmas and I hate to waste it. . .so I added the rest of an already opened bottle of Japanese Cherry Blossom lotion from B&BW. In my mind, maybe there are preservatives in this lotion that will help my DIY lotion not to go bad? I dunno. It smells good at least.
Waste not, want not.


The container still wasn't full, so I topped it off with organic aloe gel.


Then, I got out my immersion blender and blended it all up right in the jar!


The finished jar. Because it is squarish, it fits in my bathroom drawer quite nicely. I wanted to keep it out of direct sunlight, just so it keeps better.

It feels so great. It's a little greasy at first, but after about an hour it really absorbs into the skin and my skin feels super soft all day. Even my hands still feel soft. . .and I wash them like every five minutes!


The End!