Friday, September 27, 2013

The Sell-Out #1: Butterick 5890 - The Alice in Wonderland Smock Bubble Dress

I am no fan of store-bought patterns. I haven't used them in over a decade. I like to make my own. However, the other day I was at a thrift store and came across several boxes of vintage patterns. As they were $.30 apiece, I thought playing with them might be fun. Most of them were of hideous 90s dresses, but a few were kind of interesting. This was one of them. I was particularly interested in the pointed yoke and the pleated front. Also, I wanted to see how they'd patterned the pockets. 


Since, I used a pre-made pattern for this one, I called it a "sell-out." However, you know I can't follow directions, right? In fact, I looked over the directions and followed about half of them. That is the exact reason I hate store-bought patterns. They take you through all these unnecessary and confusing steps when all you have to do is think of the next logical step. For instance, they wanted me to add a zipper. Why in the world would I need to add a zipper to a dress that I'm practically swimming in?

I'm not really a good body type for this kind of dress as I don't really have shoulders, so I decided to add sleeves. This is what happened. Ick:


It looks like a feed-sack--exactly the look I was NOT going for. This was also the smallest size available on the pattern. After making it, I realized the pattern packet read, "Maternity" on the front. Oops. No wonder.

So, then I remembered I had a really comfortable, cute H&M smock dress hanging in my closet. I got it out and studied it.


My fixes were to take in the sides about two inches, peg the sleeves so they didn't stick out like a weird Sci-Fi costume, and hem the dress to just above the knee.


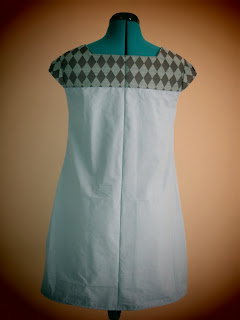
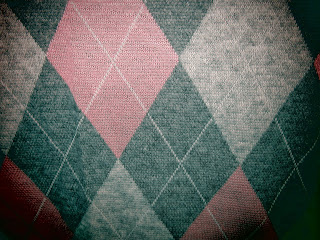
The brown and blue diamond fabric is left over curtain material from my sister's house. The blue skirt material is, I think, from hospital sheets.


Details, details:


Oh, so proud of the symmetry. Notice it around the neckline, the point, the shoulders, even the sleeves, please.


This small peg makes a big difference.


Fearful symmetry. (That is where the unnecessary zipper was supposed to go. Maybe next time, I will just put the fabric on the fold and skip this seam entirely.)


Deep side pockets. Mmmm comfort!


The End!...Just kidding, it's not.

So after posting this, I was trying the dress on, and you know what? I didn't love it. It wasn't different enough for me. I dunno, it was too poofy or something around the bottom. So I tapered the bottom hem in a little bit on both sides at an angle. Here I pulled the sides way out to exaggerate what I did. (The dress won't hang this way.)


I just think the tapering on the bottom helps to balance the architecture on the top.


Yeah, this is way more "me". . .More Asian-y looking.


The REAL End!


Tuesday, September 24, 2013

Chanel Inspired: Argyle Skater Outfit

A few days ago, my friend and former roommate, Brandy McNeace gave me a piece of this pink and grey argyle sweatshirt fabric. It was about 30" x 60":


It made me think of those Scottish Chanel dresses like this one:


It also made me think of this little skater outfit in a Clark's ad that I cut out a few months ago and really liked for some reason:


I also have been seeing a lot of dropped shoulder patterns for fall and winter lately like the one in this picture from October 2013's Marie Claire:


So I made this. It went really fast. I think pattern, cutting, and construction took about an hour:


I didn't do much to keep things symmetrical since I had to be a bit utilitarian within the dimensions of the fabric. That's also probably why I got it done so fast. Symmetry adds a lot of time to construction. The grey bands around the bottom hem of the shirt and the sleeves comes from that green skirt I used to make these couple shirts.


I did something different with the sleeves. It is sort of a modified batwing. (Most batwing shirts are constructed of one piece of fabric.)


Also, it is two pieces: a shirt and a skirt. This way they can be worn together or separately. (The elastic comes from the grey skirt I used to make those same couple shirts.)


The End!


Tuesday, September 17, 2013

Couple Shirts Made from Two Skirts - Green and Grey

This one isn't inspired by any designers per se. I just remember an episode of Project Runway where the contestants had to make a similar look for a man and a woman. I was at work when I started thinking about something simple that would translate well for both genders' body types. I played with the triangle. If a triangle is point-down, it emphasizes the broad shoulders and small hips of the male. If the triangle is pointed up, it shapes the chest and follows the curve of the hips of a female. I drew this on a sticky note and my husband said it looked like Star Wars. . .


For some reason I always had this idea in my head using jade or a Kelly green. Maybe because the color is gender neutral? I dunno. I just love green. Anyways, I could never find the right color green jersey in any fabric stores, but I did remember that I had a perfect green colored skirt in my closet that I never wear. It was actually a skirt I'd made from a dress that I'd never worn! The problem with it as a dress: It was just too frumpy. As a skirt, the hemline was always wonky and hit my legs at a weird length. I really loved the color so I'd never gotten rid of it. Therefore, the third incarnation was destined to become two different shirts!


I had another grey skirt that I'd never worn because it was too tight. I found a perfect grey skirt at Goodwill a few weeks ago, so I had thrown this skirt into my sewing room wondering what to do with it.


Here are the two shirts. There are little mistakes in both of them because I had barely enough material to do both of these shirts, so some parts are kind of pieced together (see the shoulders of the girl's shirt especially). Also, the green was wayyyyyy stretchier than the grey, so there is a little puckering that I just couldn't help. I may one day reinforce the triangle seams with elastic, but. . .let's just see how they do without it for now, I say!


This is the back:


The original dress/skirt had this fold over in the front and the back, so I kept it. It helps add just a little something feminine without changing the whole "sameness" of the two shirts. Man fashion doesn't really like embellishment, so I didn't do it to the guy's shirt.


The End!


Saturday, September 14, 2013

Prada Inspired: Black Silk and Cream Striped Puffed Wrist Sleeve Blouse

So sometimes when your husband insists on piddling in the yard doing yardwork all Saturday and you've done all your housework, you decide to piddle in the sewing room.

A few nights ago, I watched the Prada Fall/Winter 2013-14 fashion show and was inspired by these sleeves:


Here they are in fur:


Also (and I'm ashamed of this one). but I love these sleeves on this coat of the character "Joyce" on the t.v. show Siberia.


Also, I'd been seeing all these black bodice and light colored puffy sleeved shirts in the New York fashion week show. Of course I can't find any pictures of them now, but most of them would have the bodice in black leather with lighter colored silk sleeves.

My aunt-in-law gave me this polyester silk material and told me she always thought it would make a nice blouse. (I didn't want to make a whole blouse in it because I thought that might look dated, so I updated mine):


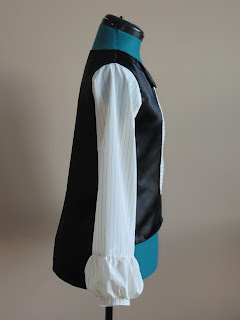
I didn't want to make a bodice in leather because I would never wear it because it would need too much maintenance. I did have some silky black shiny polyester, though, so that's what I used. I also wanted to play with a squarish assymetric front/back hem and a bow at the neck. I'm really excited, because this shirt looks exactly how I imagined it!


(The slit in the neck line is also Prada-inspired.)


I'm really proud of how it hangs. It's not feed-sacky, but not clingy either.


I pinned the sleeve back here so you could see the hem better. Also, this is what the front looks like if you just tie the tie once.


I like it tied in a little bow best:


Now some close ups:


The End! 


Thursday, September 12, 2013

Make Your Own Foaming Anti-bacterial Handsoap

I know it's midnight, but I just finally ran out of handsoap and have been wanting to make this. So excited that I'm posting it from my iTouch.
You will need a foaming handsoap dispenser, Dr Bronner's, and water. I also added lavender infused vodka to make it especially anti-bac. (If vodka worries you, skip it.)

Directions:
1. Buy a bottle of foaming handsoap from the Dollar Tree.
2. Use it up (frugal option) or dump it out (chemical-free option). 
3. Fill the bottle about 1/4-1/3 of the way with Dr Bronner's. You probably don't even need that much because it foams like crazy. (Add a little vodka if you want to kill more germs.)
4. Fill the rest of the bottle with water.

It takes about 30 seconds, saves $, and is healthier. It makes your hands feel really soft--kinda like if you've ever used soft water. Also, it makes excellent face cleanser and body wash!

Tuesday, September 10, 2013

Dolce and Gabbana Inspired: Red Lace Tunic Dress

You know the phrase, "That money is burning a hole in your pocket!". . .Well, I had two tiny pieces of that red lace left. We're talking a piece that was 35" by 44" and a piece that was 16" by 28". Anyways, I had other plans for my day, but I couldn't focus on any of them because this fabric was calling my name.

Okay, Class, remember this picture?


I haven't been able to get this dress out of my head. It's just so comfy looking that I just had to try to make it. I had hoped I'd have enough red lace to do a third look, but. . .alas, it was not meant to be. That romper will have to do.

Here is another view:


And another (the one on the right):


So, I'm not sure what the back looks like again, but I did notice that the front has this sort of dropped top hem with the material underneath. Here is a closeup:


I think this original dress is actually a red lace dress with a red slip underneath, but since I had some more red bed sheet material, I thought I might just attach them together to make one dress.

Here is what I came up with:


I know it looks sort of feed sack-y, and of course it needs the wrinkles steamed out, but it looks much cuter on a person. Too bad I'm too much of a slacker today to model it.


You've probably noticed three differences. This dress has no symmetry; the bottom hem doesn't flair out like the original (nor do the sleeves); and it's not as fitted as the original. Okay, the symmetry and flairing issues are due to the fact that I was REALLY limited on fabric. Had I had about five more inches, the dress would look a lot more true to the original. Also, the fitting issue is due to the fact that I wanted this dress to be a pull-over and not a zippered one. I plan to wear a black belt with it to cinch the waist.


This dress took about two hours from start to finish. That includes the pre-planning! Once I had my pattern, everything pretty much fell into place. I cut all four of the the dress pieces the same. Then I cut the front lace neckline slightly lower, and the front solid neckline much lower. I only had to cut two sleeves. I didn't have to hem the lace part because I'd cut around the flowers to create edging. So pretty much, all I had to sew was the front red lace neckline, the front solid red neckline, the front and back necklines together, the shoulders together, the sleeves onto that, and then close up the sides of both the sleeves and the sides of the dress. I even cheated on the hem of the solid red part as shown below. I just used a jersey stitch instead of folding over and hemming. This was to conserve the length of the dress.


I did the same jersey stitch (rather than folding and hemming) to the solid red neckline so it wouldn't fall lower than the bra-line.


The End!