Showing posts with label turtleneck. Show all posts

Saturday, April 9, 2016

Alterations: Make Shoulders Smaller in a Shirt

This post isn't for everyone. If you have been blessed with shoulders and an hourglass frame, you need not read on.

This post is for me and the other Tinkerbells out there:


Small shoulders, big hips.

So, when you get a shirt that fits like the one below (shoulders that hang off your frame), you can do the following steps to fix it. 

This shirt is Tommy Hilfiger, so. . .I guess it was made for a rugby player?


First of all, cut off the sleeves by cutting into the bodice, not the sleeve. This is for a few reasons. Firstly, since you will be taking fabric away from the bodice shoulder anyway, you might as well cut into that part. Secondly, if you keep the original seam on the sleeve, it will add stability to the seam as you ease it back on. Also, since you are taking fabric away, the sleeves are going to be shorter, so leaving the seam on the sleeve will help to save as much length to the sleeve as possible.

After the sleeves were cut off, this is what I was left with. You will see that even with cutting the sleeve off, there is still excess fabric hanging over the shoulder and arm hole area.


Using my dress form as a guide, I cut a section off. Not too much, because I still needed some left as a seam. If you don't have a form, use another shirt that fits you as a guide.


The other sleeve.


And the other sleeve cut.


Then, I took the shirt off the form and folded it in half to make sure the arm holes matched. They were pretty much exactly the same.


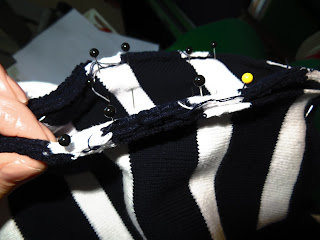
All righty. So, another issue I ran into was getting the stripes to match back up. As you can see in the picture, I pinned both the top and bottom of each stripe to keep my machine from feeding the fabric in wrongly. I will say, when I was done, most of them matched up great, but one stripe in the back I had to redo a few times. For some reason the feed dogs really wanted to pull the bottom layer through faster on that one. . .But I finally got it!


The finished shirt. You can see it fits the form much better.


You're welcome, Tinkerbells of the World!

(. . .Apologies to the rugby players. . .)

The End


Saturday, March 12, 2016

Refashioning: Dolce and Gabbana Inspired - Red Lace Blouse (Plus: How to Fix Snags!)

By now you should know that I love Dolce and Gabbana and get a lot of my inspiration from this designer house. Today, I will show you how to update a red lace blouse to look similar to the D&G ones below.


So here is the blouse I found. It was on a dollar rack, so. . .again. . .I thought it was worth a dollar to see if I could refashion it. Notice how long the sleeves are and how they bell out. That's not my style at all! (No judgement if it's yours, though!)


Okay, before I get to how to fix it, I need to address how to get rid of snags. See the one in the picture below? This poor shirt was covered.


This is an old trick my mom taught me years ago. Find a needle threader. They usually come in those little travel sewing kits, but you can also find them in the sewing notions section of fabric stores.


So, what you do is you push the tip of the threader through the base of wherever your snag is. Make sure you poke it through very close and in front of the snag.


Then, with your finger, guide the snag into the loop of the threader.


Lastly, pull the snag through to the other side. Done! Good as new!


You can't even tell where it used to be. (I know you THINK you can tell, but that's actually the seam you are looking at. The snag in question is a tad farther to the right of the seam.)


Okay, so now that all your snags are fixed, let's get to altering this blouse! Look how long the sleeves are! (Sorry, no full body picture. I was in pajamas with no makeup.)


I cut the sleeves out and look what the armpits did! They jutted out at both sides.


So, I pinned them.


When I pinned them down, I noticed that the top of the shoulders started to gap, so I pinned those too and sewed every down.


Next, the sleeves.


I used the sleeve of a shirt I knew fit me as my pattern.


Then, I cut about an inch or two off the top of the sleeve. I just free-handed the curve because I've done this a million times.


Okay, really important: When you attach sleeves to a bodice, make sure to pin the halfway point at the top of the shoulder of. Then make that pin match the top of the shoulder of the bodice. Pin it. Pin the armpit seam of the sleeve to the armpit seam of the bodice. THEN pin the rest of the sleeve up. Always work at the two extremes before you pin the rest of the lengths and you'll be way less aggravated.


Okay, I actually had to take a little more off the sides of the bodice, but here is the finished shirt with a red tank top under it.


Remember that skirt from my last post?


The End!