So today, Kiddos, my inspiration comes from the designer Kate Spade. As in the skirt below.

However, I'm not a huge fan of folded-out pleats that create a panel in the front like that one. I am more of a pleats-folded-in sort of girl like the Kate Spade skirt below.

So here is my dress I will be using. I was only fifty cents at the thrift store.
(Note for beginners: Practice your refashions on thrift store items!)


Here is why the dress was on the fifty cent rack: The bottom blind-stitch hem had fallen out. No matter! Easy fix!

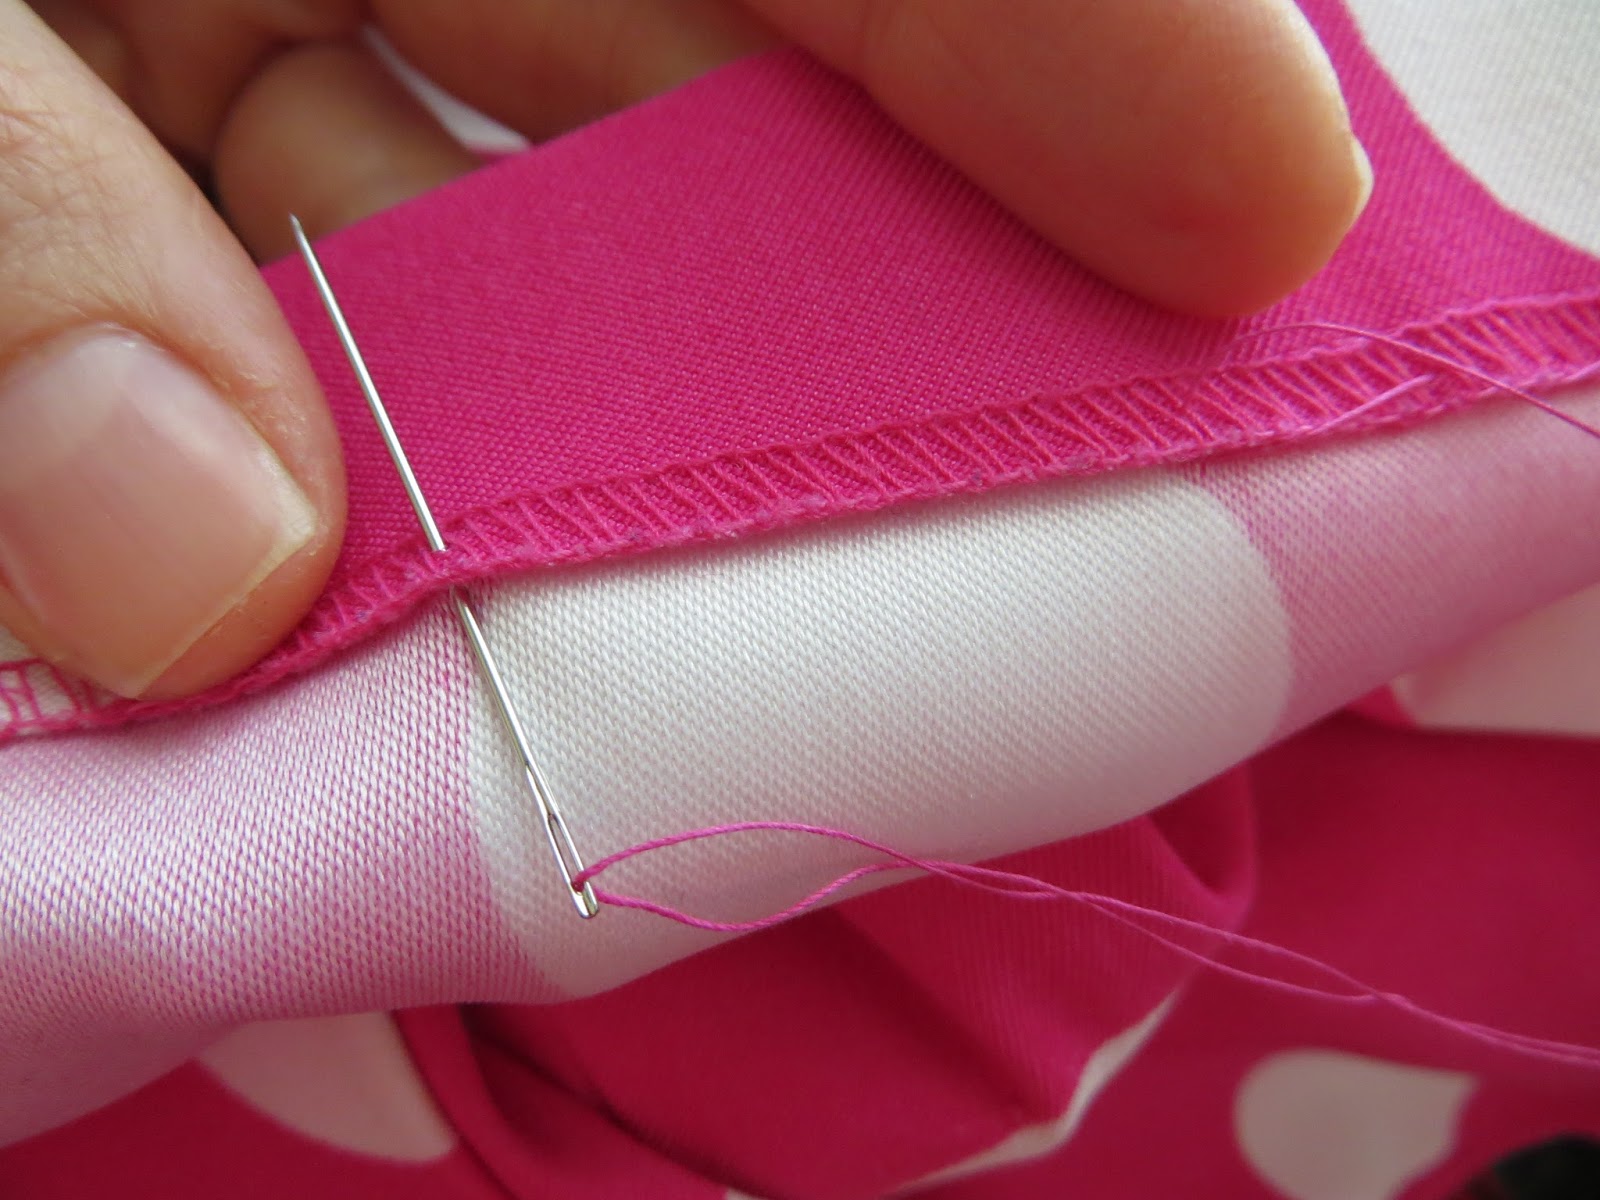
Here is how to do a killer blind hem stitch: With your needle, just barely pick up two threads from the front and stick the rest of the needle through the folded up hem like how you see me doing in the picture below. Skip between a centimeter and an inch and make your next stitch. Keep doing that all around the hem. . .However. . .

If you really want your stitch to be blind, skip over parts on the front that don't match your thread. See the picture below and how I've skipped around the white polka dot. Look where both my fingers are and you'll see where the thread begins and ends.
Here it is from the front. It's not a big deal if you have a little stitch there. It's just a preference for me.

Okay, so now to make the skirt.

All I did was kind of eyeball where the bodice area was from the where the skirt area was and cut between the two. It doesn't have to be perfect at this point. All you are doing is freeing up the skirt area.

NOTE: Before you start cutting!!! If your dress has a zipper and you want to save it, make sure to pull it completely down BEFORE you cut!!! Otherwise you will have to take it out and install a new one--and no one likes that!

Okay, so what we are looking at here: the top layer is going to be the front, and the bottom layer will be the back. I have a butt, okay!. . .So in order to allow for "butt rise" (there is no other way to describe it), I always make the back of my skirts and dresses just an inch or so longer in the back. This way, the skirt hangs at the same length all the way around.
If you have no butt, good for you. Just make both layers match in that case.
(And know that I secretly hate you. . .Just kidding.)

Now, measuring from the front (top) layer, figure out how long you want your skirt to be. I decided 22" was a good length. You can see where I made a mark at 22" on the picture below. Move the ruler/tape measure across the skirt and make other marks at the same measurement. Be careful not to shift the fabric around as you do this or all your measuring will be in vain.

Once you have enough marks going across your skirt at the same measurement, take your scissors and cut across like you are playing "connect the dots." Be careful not to shift your fabric as you do this, so use really sharp scissors. . .or use a cutting roller like I have. Cutting rollers are the best way to cut without having to pick up or shift anything. I highly recommend them (and a cutting mat).

Okay, set the skirt part aside. We are going to work on making a waistband now. I just used the bottom part of the bodice section of the former dress to make my band. I folded it up two inches and cut across. (This means, I had a strip of fabric 4" wide. Make sense?) You don't have to do two inches. You can do one inch or three inches. Whatever you have to work with and looks best on you. I just think two inches looks best for my dimensions.

I hate having to do this part, but it's necessary if you want your waistband to be straight. Pin your fabric in half, and iron it so that it stays folded perfectly in half.

Okay, there are many ways to do this next step. This step is the part where we stabilize the waistband. You really need to stabilize it, because it is the part that is going to hold up the rest of the skirt, so it needs to be thicker and more sturdy. That said, if your waistband is too flimsy, the skirt will hang funny and the waistband will cave in and get really unsightly wrinkles from the weight of the skirt. ALSO, if your waistband fabric is slightly stretchy (as my pink and white fabric is), it will need to be stabilized so it doesn't stretch out of shape.
Probably the best way would be to cut a strip of fusible stabilizer, half the width of your waistband, and iron it to the inside of one of the folded sides of the waistband, but. . .I don't have any fusible stabilizer. . .Actually, I probably do. . .but I didn't feel like looking for it, so I grabbed some of this 2" wide ribbon instead.
Besides that, if you are a beginner, I bet you don't even know what I'm talking about when I say "fusible stabilizer." You are probably like, "What??? I need something else other than a sewing machine and thread? Why? Why do I have to buy something else before I can even do a project??? This is ridiculous! I quit!"
So, don't quit. Just grab some ribbon from your gift-wrap basket or you could even make another double-folded piece of non-stretchy fabric the same size as your current waistband.

All I did at this point was stick the ribbon inside the fold, and holding it in place, I top-stitched along the fold. (If I'd used fusible stabilizer, I could have skipped this part because iron-on stabilizer stays in place on its own.)

Then, I zig-zagged along the raw edge. You really need to hold everything in place as you do this part because the fabric likes to shift while you sew--again, less likely to happen if you use fusible stabilizer and non-stretchy fabric. Holding the band tightly with one hand behind the machine and one in front as you guide it through, really helps.

Okay, so now comes the pleating part. You can do pleats however you want--folded in or out. You can do knife pleats, box pleats, accordion, etc.. Google "types of pleats" and a wealth of information will appear from which you can choose. Anyways, I decided to do knife pleats folded in.
The important thing here is to KNOW YOUR WAIST MEASUREMENT. Mine is 28". So what does that mean? It means simply that when I am working on the front or the back pleats, I need to make sure that when I am done, the length of either side is 14". You can see in the picture below that from side seam to side seam, the measurement is 14".
And, let me show you something else. . .

See how my hand is tucked under the pleat? That's what I mean by my pleats folding "in." If you don't like that, fold them the other direction to make them fold "out." Or do box pleats. . .or whatever you want!

So, here is a closer look at how to make a pleat: specifically a knife pleat. Look at the top edge of the fabric. Do you see those two black-head pins? (One is around 10" and one is at 17.5")

The picture below shows the space between the two pins folded up in thirds. That's how you do a knife pleat. If you want your pleats folded in, then from the perspective of a person looking at the skirt (NOT wearing it), do all your folds exactly like this on the right side, and fold them the opposite direction on the left side.
If you want your pleats folded "out," and prefer a panel sticking out at the front (like the very first Kate Spade skirt pictured), then fold all your pleats exactly like the picture below on the left side, and do the opposite on the right side.

REALLY IMPORTANT: Once you make your pleats, pin them vertically like this: Do NOT pin each pleat with one horizontal pin! Doing that allows for bunching to happen around the feed dogs depending on the direction of the pleat; PLUS, you can't sew over horizontal pins, and you need your pins in place all the way up until the machine actually goes over them or else the pleats are likely to fall out, and you'll be sitting there at your machine crying because of all the work you just undid!
("It sounds like she may have done this to herself in the past. . ."
Yes. Yes, I have.)

Here are my front pleats. Again, I made sure that the length of the waist was 14" across from side seam to side seam.

Okay, if you are new at sewing, I would advise you to go ahead and stitch your pleats down about 3/8" from the raw edge, but if you have pinned your pleats down EXACTLY like I told you to, you can go ahead and pin your waistband on and do this all in one fell swoop! All you need to do is to find the middle of the front of your skirt and the middle of your waistband and start pinning. These pins you can do horizontally. I will let you. :) Just make sure to pick them out before your machine runs over them.

It looks messy, but. . .don't worry. We'll fix the mess. All I'm showing you here is that I have everything pinned in place. Also. . .and I know it's hard to see, but I've finished the sides of the waistband so the edges at the closure point aren't raw. I'll point this out again later when it's easier to see.

Now, just sew about 1/2" from the edge. Pull the horizontal pins out BEFORE they get to the foot, but leave the vertical ones in until you sew right over them. Continually check what is happening underneath to make sure you aren't catching extra fabric up there and that all your pleats are being sewn in the direction you want them.

Here is the waistband on the skirt. You can see the zipper only zips up to the top of the skirt, and that the waistband gapes open.

So, I hand-stitched a snap near the top of the waistband. (You can see here more closely where I finished the sides of the waistband by fold them over and top-stitching.) You don't have to do a snap. If you want to attempt a button hole, you can just rip a button off some garment you never wear anymore and sew that to the other side. Or you could even sew two lengths of narrow ribbon to the top to make a tie closure. Or you could use a hook and eye. There are many ways to skin a cat. I used a snap.

Okay, you don't have to do this part, but if you hate messy seams, then do it. Half the fun of owning Kate Spade clothing is the fact that she does cute little finishes to the inside of her garments, or like puts a cute little saying in them or whatnot. In this spirit, I grabbed some polka dot ribbon to cover my seams.

There, not so messy.

The finished skirt! Cute as a button!


The "Before and After."

The End!
Marvelous!
ReplyDelete