So I have a weirdly small face, and it's not easy for me to buy glasses at optician offices. I enjoy buying cheap glasses online from places like Zenni (click the link for $5 off) and Eyebuydirect (Click the link and enter: IFPGTPHSFC for $10 off!). You can find glasses for as little as $6.95 a pair including lenses!
(Many people complain that buying glasses online is too risky. All you need is a ruler that measures in centimeters to measure the width of your face, pupillary distance, and lense size. You also need your current prescription. Both of these websites let you virtually try on glasses before you buy.)
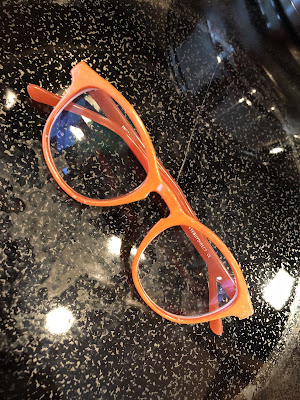
So...I have this thing...where I feel like I have to have everything in every color. So far, I have several pairs of glasses in several neutrals, red, blue, yellow, and purple. Then, I saw these orange ones on Eyebuydirect. On the site, they looked to be a very bold orange, but in reality they were more like a rusty brown:
You can see, they really read as brown when I wear them!
Well, that was disheartening, especially since I’d ordered two pairs!! (I work for VIPKid, and wanted orange glasses for teaching, and then one pair for wearing normally.) Well, since I’d ordered two pairs, I decided to search Pinterest for some ideas on how to change glasses frames’ colors. One blogger mentioned painting with nail polish. What a terrible idea!! The color was what I wanted, but look at all the terrible brush strokes!
Here you can see the brush strokes more clearly. Gross!
See how bad the nail polish looks on me? It just looks dirty. So annoying.
Okay, so the next part of the blog is some trial and error. If you are strapped for time, skip to the end. If you wanna see the entire thing, stick with me. (It won’t take long. Don’t worry.)
So, another blog suggested popping the lenses out and spray painting them. Okay, that is a dumb idea for several reasons: (1) I’ve spray painted things before, and it’s really hard to do in winter, because it’s cold and windy, and you can’t do it in your house because of the fumes and the potential mess. (2) Spray painting is fine for shoes and some clothing, because they are far enough away from people’s sight lines that an uneven coating isn’t too noticeable. Because glasses are on your face, the coating needs to be PERFECT or else it looks like trash and you will never wear them out of the house. Trust me. (3) There is no way to ensure that the inner ridge for your lenses stays clear of paint buildup. You need to be able to pop your lenses back in, right? You can try to tape off that inner ridge, but then your spray coating needs to be super super accurate. If you have ever spray painted anything before, you will know that this is a fool’s errand. There is a reason people use spray paint for big projects and not little ones like glasses. (4) Blog posts of glasses that have been spray painted look like crap. I know that sounds mean, but. . .I’m being honest.
Glasses are on your face, People. They need to be PERFECT. This is not time for arts and crafts!
So, what to do....
Then, I started searching synthetic dyes. I have dyed some of my clothing before with fabric dye. But I had no idea that there was such a thing as synthetic dye. I watched a few YouTube videos of guys who had dyed their frisbee golf frisbees with synthetic dye, so I thought. . .maybe that would work!
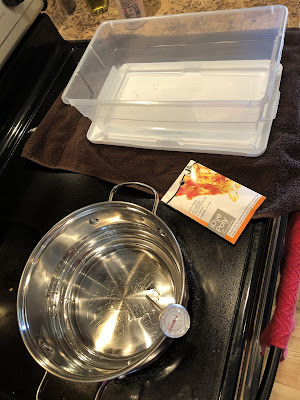
I found a dye called iDye Poly (from Amazon) in a bold orange color. The directions said to add the dye and the reactor (in the same package) to boiling water. I got an old pot (NOT USED FOR FOOD, OBVIOUSLY!!!), a packet of dye, a meat thermometer, and a small tub of cold water.
Make sure you’ve removed your lenses, before you start dying them!!
So, then I brought water and the dye to a boil.
The package said to keep the dye at 165 degrees, but a helpful YouTuber said to keep the water around 140 for thin plastic (so it won’t warp), dip it for a few seconds, rinse it in cold water, and then repeat until the color is what you want.
I didn’t want to ruin my meat thermometer, so I measured the heat from underneath the pot.
So that’s what I did....dipping, and....
...rinsing....
I did that over and over for about 30 minutes, but the color still wasn’t where I wanted it, although, it became definitely bolder. This is probably due to the fact that I was dying on top of a translucent rust color. I should have started with a lighter orange, yellow, or even clear frames....oh well.
Just to show you, I put the original photo underneath this one, so you could compare.
After:
Before:
And if you need to see them on my face, the first one is the before, the second is after. Even though, the color looks very different in the pictures above, you can see below that they still look brown on me (and when I wear brown, it really makes my nose stand out!!!).
Before:
After:
So....that was a frustrating waste of time. I was back at square one. I was going to give up, but then I started searching Zenni again and found these: orange and pink (because I’d been wanting some pink ones for a while too.)
This is what they looked like on me. I mean....they are okay, but...the color is so light that they kinda wash me out and age me.
So....third time’s the charm, right? I ordered some RIT DyeMore Synthetic dye (also from Amazon) in pink and orange.
I repeated the whole “dip and rinse” method that I had done above. The pink ones took about fifteen dips. The orange ones I dipped twice!
FINALLY! Colors I like!! And so professional looking! Also, notice that my face looks so much more proportional and in focus! Colors are important!
Before: (so you can compare)
And because sometimes, the dying process can shrink your frames a tiny bit, and your lenses may no longer fit.....
Bonus: Video on how to get lenses back into frames when they won’t fit!
The End!


