Showing posts with label wrinkles. Show all posts

Friday, April 22, 2016

De-Fashioning: A Silk Dress into a. . .Beauty Pillowcase?


So this one is going to be a little backwards. . .That's why I called it "De-fashioning."

I have been trying to sell the following dress on eBay for TWO YEARS, and it has been hanging in our spare bedroom. I bought it on sale for next to nothing from an online consignment store--even though it's totally opposite my body type--thinking I could resell it and make a profit. It is 100% green silk satin. It is "Laundry by Design" and was originally $300, or something! I had it on eBay for some ridiculous price, like $13. Lots of people viewed it and a couple people added it to their watch lists, but no one ever bought it or even made an offer!


This is the back. 


So, now we come to the epiphany that I had today. I have been reading more and more (from very informed places like fashion magazines and. . .Pinterest), that I should be using a silk satin pillowcase. It's apparently good for your hair, because it doesn't strip your hair of oils like cotton does, and doesn't promote breakage due to its slippery nature. It can also benefit your skin by not promoting acne and wrinkles because it's organic. So, here's the epiphany I had: Why should I pay money for a silk pillowcase, when I already have one hanging in my closet?

See how it's backward? Normally, a DIYer tells you how to make something from nothing. Here I am telling you to cut up a frickin' $300 dress to make a pillowcase!!! 

Now, here's why I'm posting this: You can create a beautiful silk pillowcase yourself by frequenting thrift stores and looking for silk items on their sale/dollar racks. I just bought a 100% silk hot pink over-sized shirt yesterday for $.40! So, it can be done! I once found a 100% silk zebra print prom dress for a dollar. (I blogged about that one here. I turned it into a skirt.)


So here you can see the metallic sheen. (It's actually much greener in real life.)


First step.


I opened the dress out. The part on the left was polyester lining that I discarded. The part on the right is silk.


It's hard to explain, but the bottom strip of the dress was sandwiched between the lining and the fashion fabric. In order to free it, I cut this seam off.


So, here is the dress in all its fundamental parts.


The part on the right is the bottom strip I was talking about before. (You can see the ironed fold down its center that I opened out.) I used this measurement as my guide for cutting the bigger section of the dress. That part I'm cutting off on the bottom of this picture will come up later.


After I cut, I "trued" up all the sides. This took awhile because silk satin is EXTREMELY slippery.
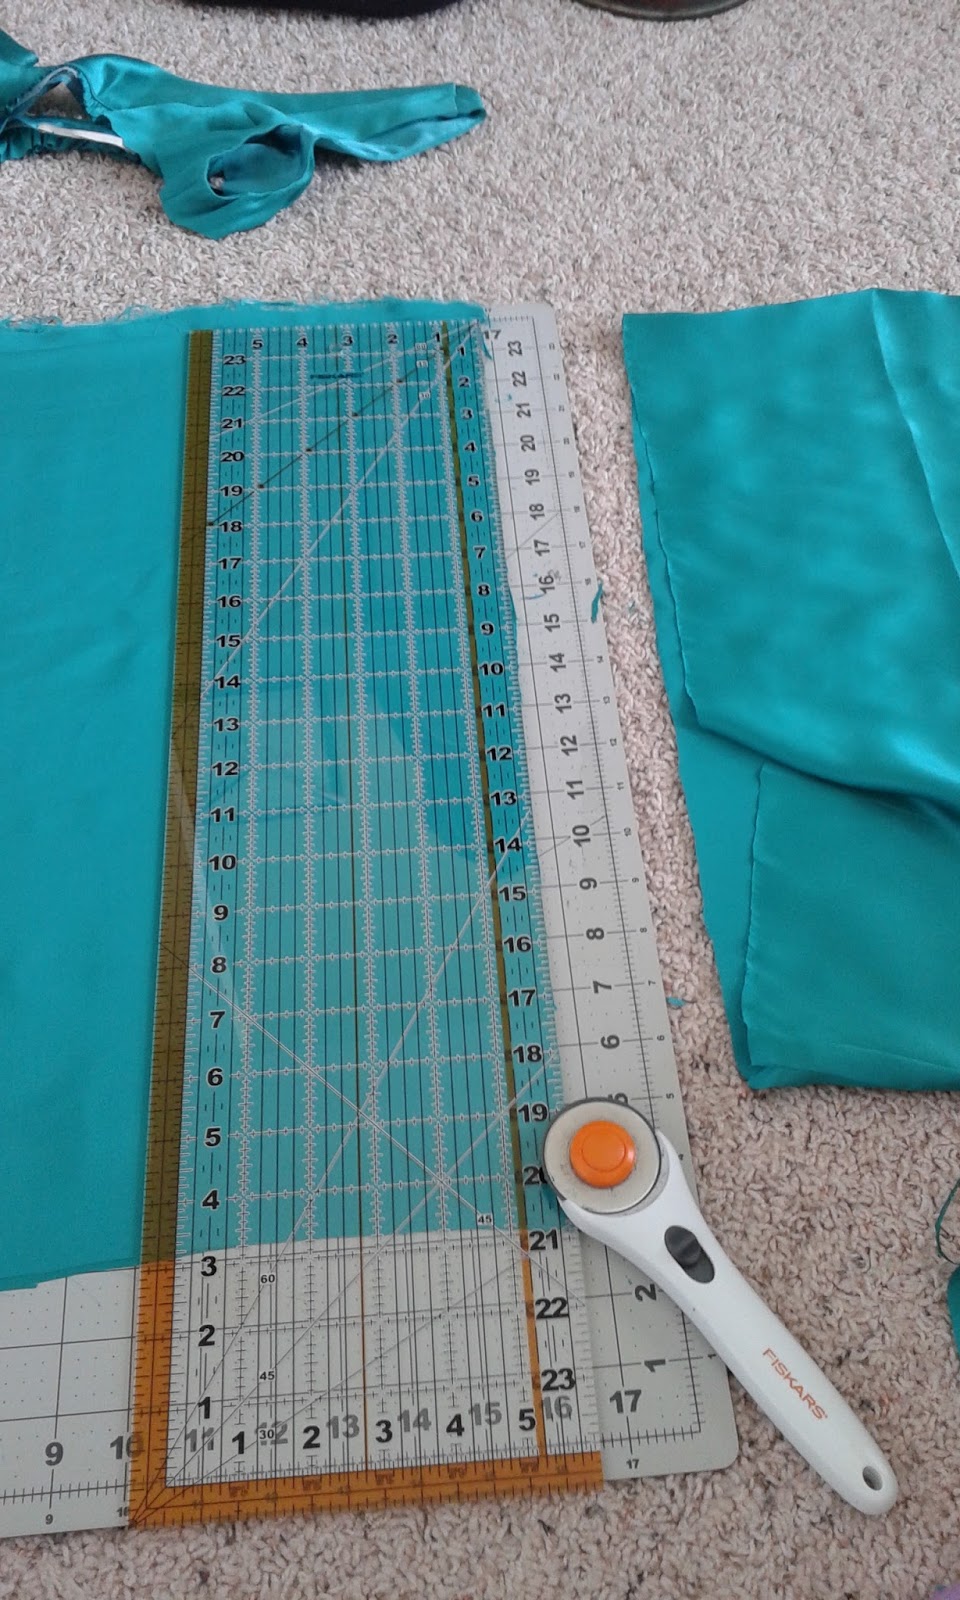


I got all my sides cut. If you look on the left-hand edge, you will see a seam. That is an original seam of the dress. I figured that would be one less seam I'd have to worry about sewing, so I used it!


This is that little part I cut off earlier. This would become the opening of the pillowcase.


I measured it out and trued it up as well.


I sewed both ends of the band. . .


. . .and then I folded it in half, ironed it, and set it aside.


Even though it had straight seams, I still used pins because it wanted to slide all over the place.


So, here you can start to see the pillowcase coming together.


I made sure to zig-zag all my seams, because this fabric was fraying like crazy!


All I needed to do now, was attach the band.


And through the magic of blogging, it is now attached.


I cut off all the excess fraying.


Okay, I know what you are thinking. "If she is worried about wrinkles, doesn't she realize she has a big old seam down the middle?" Don't worry, I'm way ahead of you.


See? I have one of those chiropractic pillows where you sleep on your back when your head is in the middle, and on your side when you are on either side. You can see the seam is in the perfect place. My face will never rest there.


Okay, another tip, and I would've explained this earlier, but it was too confusing. Anyways, if you make a pillowcase like this, make sure that the slippery part goes from side to side and not up and down. You move from side to side in your sleep, so you want the sheen to go with your movement and not against it.


So, I pretty much used the entire dress for this. I just wanted you to see. (That big part is the lining. Look at what is left of the actual silk! Not much!)


The End!


Sunday, June 30, 2013

Make Your Own Anti-Aging Shimmery Face Powder

I thought making face powder would be something esoteric and mysterious, but as it turns out, you only need two ingredients: corn starch and cocoa powder. If you are light skinned, start with corn starch and add cocoa till you get your color. If you are dark skinned, start with cocoa and add corn starch.
The End.


However, if you want the advantage of anti-aging and shimmer, add these ingredients: cinnamon, gingko biloba (all you do is open a supplement pill and dump it in), and pearl powder. You can actually use any spice/plant powder that is tannish/brownish/shiny and is skin-beneficial, but I used these three because of their cell-renewal and antioxidant properties, and because I already had them at my house. It's like giving yourself a non-pore-clogging, sun-protecting, day-long facial!


You can buy pearl powder from eBay. It's under $10 for 100g (which is going to last you several years), or you can do what I did: Wrap a pearl in tin foil. . .and HIT IT WITH A HAMMER!


I put some of the pearl powder in my face powder, some in my eye shadow, and some in my blush. I got the idea for pearl powder because some of my BB cream from South Korea has pearl powder in it, and I love it. Pearls are organic, right? It makes your skin really shimmery.


Fun Facts and Tips:

1. Pearl powder has long been heralded in Eastern medicine as an anti-aging, sun-blocking protectant to skin. Some people even take it internally as a supplement.

2. As I said in the makeup homepage, make sure to make only a small amount at a time and clean your brushes very regularly. You can prolong the life of your powder by adding baking soda, but that can be harsh if you have sensitive skin. It's up to you! I made the small jar in the first picture with no baking soda, and that lasted a month with no problems.

3. Corn starch is a super strong oil absorber (the main ingredient in "CornSilk" powder, in fact) and cocoa is a great antioxidant and natural sun protectant. Using these two ingredients alone sets my makeup all day without constant dabbing--even better than my store-bought mineral powder!

4. You can make a small jar for about a penny, and you can be sure it fits your skin tone!

5. Here's the one drawback: If your face gets wet or sweaty, the cocoa in the powder will turn brown. Therefore, if you want to make a cheaper version of powder that you can work-out in, I suggest buying some regular powder or bronzer makeup a few shades darker than your skin tone and adding corn starch to it to stretch the formula out. It's not all-natural, but it is a far cheaper method of doing makeup.

For a complete list of make up DIY, go here.

Wednesday, April 24, 2013

Make Your Own Eye Cream

I am really excited about this eye cream. I've been using it for a while now before bed and it's really good. It keeps my skin really supple and non-wrinkly, and because it is kinda waxy, it keeps my skin moisturized even after I've washed it off the next morning. If you have really oily skin, I think this would still work for you because natural ingredients tend not to mess with your ph balance. Try it and see!

There is really only one step to this process if you followed my last two blogs (especially the one on making lip balm). All three processes took me 20 minutes total to do. To bring you up to speed, I suggest going here.


How to Make Your Own Eye Cream:

After following the directions on my last blog, all you have to do is add a table spoon of honey. I suggest using local honey as it helps your tolerance to pollen allergies. Honey is what changes the consistency of our lip balm into a cream, and honey is really good for you and your skin. If you are allergic to honey then use olive oil:


This step is optional, but you can add another fragrance if you like. I added lavender because it smells good with mint, and also it's good for your skin:


Stir it up and pour into a small cosmetic jar:


Put it in the refrigerator for an hour or so. Spread it on your eyes with your fingers in small massaging circles.


Things to remember:

1. The reason I did green tea and coffee bean butters is mostly because I knew I'd make this eye cream last and both of those butters have anti-aging properties.
2. Coconut oil and honey are anti-bacterial. Probably the others are too, but I know those two are for sure.


The End!