So, I have already given a tutorial on how to make a CoVID-19 mask, which you can find here. But after thinking about it, and looking back through my inventory, I thought up a new design. Like the other one, it is reversible, reusable, washable, uses cotton and flannel, and has a conformable nose bridge wire. However, instead of having the ties (around the back of the head or around the ears), this one uses elastic around the ears. This may be a better design since elastic is easier to deal with at times than ties. Plus, the sides are gathered with elastic instead of pleating. Also, the biggest advantage I found is that once you get the hang of them, these can be made in half the time of the other ones.
So, first of all, I made two sizes. One is made from 8”x8” squares. This is for L/XL heads. The other size is 6”x8” and this fits children and S/M heads. I personally can wear the S/M version and my head is about 21” around if that gives you some idea.
I ran out of the chenille wire from before, so I bought a back of pipe cleaners at Dollar Tree. There are 45 in a pack. They are 12” long, so I cut them into 4” pieces. These are for the nose bridge wire.
The first step is to use a zig-zag stitch and sew the pipe cleaners to the wrong side of the cotton fabric. Center them at the top and down about 1/2”. (If you are making a 6”x8” size, you will sew this to one of the 6” ends). I used a button hole foot because it has a groove on the bottom of the foot that guided the pipe cleaner through and kept it straight.
This is what it looks like from both sides when you are done.
Next, cut two short lengths of elastic. I cut them 8” long, but you may want to test this out yourself. Make one as practice to see if it’s the right size for your head.
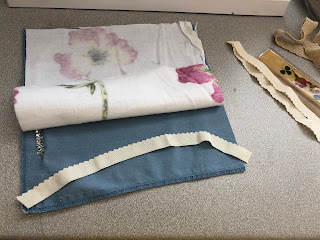
You will pin these between the right sides of flannel and cotton fabric on both of the longer 8” sides. Pin them like you see below. I’ve opened the layers to show you what it looks like between the layers.
So once you have the elastic pinned into the seams of both of the longer sides, you just sew up all four sides, leaving an opening on one side to turn it right-side-out. I left this opening on a short side which was opposite the nose bridge wire.
So this is a little hard to describe. You want to tack down one end of elastic that will run down both of the longer sides. Don’t pre-cut this elastic. When turned right-side-out, this is what will create the gathering on the sides of the face. So, tack it down like this....
Then, sew down that longer side, and as you turn to sew down the other shorter side, pull the elastic tight. This requires some skills. You need to pull the elastic tight with both hands. Then, place the fingers of your right hand on top of the elastic and on either side of the presser foot. Let go of the elastic in your left hand, and release your presser foot. Then sew really quickly across the elastic. I back stitch over the elastic to make sure it holds. Then, once it is secure, you can cut this elastic. You will do this on both of the longer sides.
This is what it looks like inside-out.
And this is what it looks like right-side-out. Make sure you really push the corners out. You have one step left after this.
Again, this is going to take some skills. So, basically all you are going to do is to sew a big square around everything again. However, you need both hands and your wits about you. I start on the side with the hole. I sew up that side, stopping about 3/4” from the edge.
Then, when you come to that first elastic side, turn the corner and put the presser foot back down. Again, this requires both hands. Hold the fabric under the foot in place. . .
And then pull the inside elastic tight. Using both hands, guide the fabric down as you sew. Make sure you hold the fabric at the top and bottom and guide it through. Don’t just pull it through, because you will break your needle. This will not be perfect, and that’s okay. You are just creating a channel for the inside elastic so that the fabric will lay correctly against your face.
When you sew up that last side, be sure to back stitch to tack everything in place.
So this mannequin is pretty small, but this is the S/M one.
And this is the L/XL one. You can see from the one above and below that they are reversible. Make sure you decide AHEAD OF TIME which side you want against your face. If you switch the sides halfway through the day, you’ve just negated the entire reason for wearing the mask!!
If for some reason your mask is too big or you just don’t want to wear it behind your ears, you can put a paper clip behind your head and attach it that way.
The End!


