Saturday, December 14, 2013

Make Your Own Foamy Steamed Milk Without an Espresso Machine

The holidays are coming up, and nothing gets you awake and ready for Christmas morning like a nice cup of coffee with foamy milk! However, what if you don't have an espresso machine? I have an espresso machine now (you can get a decent one for $40 at Walmart), but back in the day, I used to do this easy little trick to make foamy milk for coffee. 

What You Need:

1. A small microwaveable container with a tight lid.

2. Milk

3. Microwave


Directions:

1. Pour a little milk into your container. (No more than 1/3 the depth of the container.)


2. Put the lid on and shake it within an inch if its life. Do this over the sink in case your seal isn't very tight.


3. Immediately put it in the microwave and microwave for about 30-60 seconds, monitoring it closely. You may need to stop it at intervals and re-shake (over the sink).


4. Pour over your coffee!


The End!


Thursday, December 12, 2013

Make Your Own Best Face Wash Ever!

Ingredients:

1. Witch Hazel
2. Dr. Bronner's (peppermint)
3. Activated Charcoal powder (optional)

Witch Hazel is a super great toner. Way easier on your skin than the stearyl alcohol in most face wash. Dr. Bronner's is super effective, gentle, sudsy, and organic. Plus, the peppermint one helps open your pores. Charcoal is a very effective purifier, but if that confuses you, skip it.

I put a little Bronner's and a tiny scoop of charcoal in a bottle and filled the rest with witch hazel. You can play around with ingredients and amounts. I like being able to tailor ingredients to my personal needs.

For dry skin: Skip the charcoal and add a little olive oil or castor oil.

For oily skin: Add a tiny bit of lavender infused vodka or more charcoal.

I saw huge improvements to my problem skin after one day of using it, but I've now used it for two weeks with no change in effectiveness. Usually my skin builds up a tolerance after a couple of days. It helps to wash with warm water followed with a cold water rinse to open and close pores.


Learn from my mistake: 

If you would like to put this concoction in a foaming bottle, skip the charcoal. It clogs it. (Front of picture = good. Back of picture = bad.)


The End!

Saturday, November 23, 2013

Alloy Inspired - Heather Blue Sweatsirt With Black Silk Sleeves


II have been trying to make this shirt from Alloy Magazine for awhile. 


Today after making the DKNY shirt, I had a "Eureka" moment. The whole process took an hour--patterning and construction. 


 The End!


DNKY Inspired - Oversized Colorblock Sweater

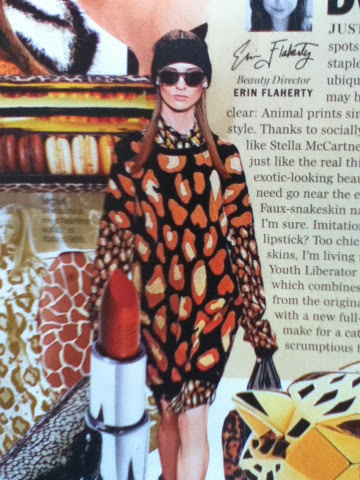
I like this DNKY fall/winter sweater.


I just don't have any leopard print jersey, so I color locked it instead. I also added pockets. 


The End!

UPDATE: Okay, since making this, I decided that I hated the sleeves, because they were too long and always fell down. I felt like I was an orphan in this shirt...so I made the sleeves thinner. It helps to balance out the gigantic-ness of the shirt:


Friday, November 22, 2013

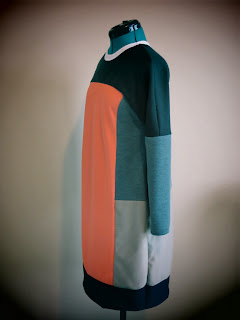
Two More Fendi Inspired Colorblock Knit Dresses - Teal, Tan, and Grey - Blood Orange, Plaid, Brown, Grey, and Tan

I love this Fendi dress. . .


. . .So I decided to make two more!


I don't know if you can tell from these pictures, but I took a little time to refine the shoulders/sleeves pattern and I brought the drop waist up a little from my last endeavor. I still like the first dress, but these ones are just a little more comfortable and fit just a little better. Once I was happy with my pattern, I simply cut out both dresses and sewed them together almost at the same time. This really cut down on construction time--doing two at once.


It's crazy how just changing the color scheme gives the dress a whole different look. I think these teal green/blues make the dress look sporty whereas my last one looked european.


This blood orange one looks bookish and Autumn-y.


The dark orange part isn't double knit. It's actually semi-stretchy faux suede. You use what you have!


The End!


Monday, November 18, 2013

Fendi Inspired - Colorblock Knit Dress - Salmon, Black, Tan, and Grey

Whether or not you liked my Fendi Inspired outfit a few weeks ago, I haven't been able to stop thinking about the salmon, black, tan, and grey dress that I used as inspiration.

 You can see the front and back of this dress here.


I went to a thrift store and found a bunch of different colors of double knit polyester and then realized I had the exact colors to make this same dress! The pattern isn't a traditional one and it's been baffling me, so I've been putting this one off for a few weeks to wrap my head around it. Then, husband and I didn't leave the house on Saturday, so I decided to make this dress. I have run out of the brown packing paper that I've been using to make patterns, so I taped some newspapers together for this one. It took several hours to figure out how, not only the dress is put together, but how to proportion it for my body--decidedly NOT model shape!

Anyways, skipping ahead several hours, here is the finished dress. Pretty good, huh? Actually, I found the salmon, tan, and grey in double knit, but I couldn't find any black jersey that was thick enough to support the thicknesses of the other fabrics. Fortunately, I found a thick black maternity skirt at another thrift store and just cut it apart.


 It's harder than you think to get the seams to match up. This fabric is really thick. If I didn't have a Husqvarna, I would have been dead in the water!


 You would be horrified if you saw how I put the collar in...I cut the white off a dress I was getting rid of...Anyways, you'd be horrified. I did it in like five minutes.


The sleeves were the hardest part to pattern because they didn't follow the traditional pattern. I don't think I got them quite right, but I will make another dress using this pattern and I will fix them then. They are good enough for this first try, though!


The End!


Tuesday, November 5, 2013

Make a Bag from an Old T-shirt in 10 Minutes or Less

I got back from my mission trip to Montana for which I packed here last Friday. Anyways, the missionaries we helped used to have big youth camps at their mission called "Four Winds." As a result, they had a bunch of old child-sized T-shirts. I decided to turn one into a bag. Actually, I was almost done making it when I realized I hadn't taken any pictures of how to do it, so hopefully, you can figure it out from the pictures below.


The strap is made from cutting the bottom of the shirt off.


The main part of the bag is made from cutting the sleeves and neck/shoulder part off and then, using a jersey/surger stitch, sewing the bottom and the arm holes together, and then just hemming the raw edges. Easy! The whole thing takes about 10 minutes.


The End!!!


Friday, October 25, 2013

How to Pack for Cold Weather

Since the holidays are coming up, and many people will be traveling, I thought I would take a minute from my packing (to visit Montana on a mission's trip) to show how a woman packing warmly doesn't have to pack a lot. The keys are to stick to one color scheme, pack lightweight yet warm fabrics like fleece and wool, and pack layers rather than bulky items. I've packed everything I need in a small rolling carry on and a large purse. (Incidentally, the carry on has a lock on it and an expandable zipper.)

The trip will last about six days, but with what I've packed, it could last longer because almost everything can go together in different ways. I'll dissect my carry on and purse in a second, but before I do, I want to point out what I will be wearing on the plane: Sketchers boots, a long-sleeved hip-length taupe shirt, orange skinny jeans, and a light taupe fleece vest. (If I get hot, I can take the vest off. I can also pair it with other items in my carry on later if I get cold during the trip.)


Now to dissect the carry on: The inside flap.

1. 5 pairs of fuzzy socks. These are essential for sleeping and really make a difference inside your boots when the temperature drops. They also dry within a day if you have to wash them in a sink.
2. 6 pairs of underwear and socks. (They can also be washed in a sink if needed.)


The Top Layer (sorry, Blogger put it in sideways)

1. 6 pairs of black and grey fleece-lined tights. These can be worn by themselves under long shirts and dresses or under skinny jeans for added warmth.
2. Running shoes inside a mesh laundry bag. I can use the shoes for exercise, but also as alternative footwear if my boots start hurting me. (Always bring an alternative footwear option. You never know how much you'll walk and your feet may need a break.) These shoes are Sketchers "Go Run" and they are super comfortable, but also squish up nicely into luggage. Also, the mesh laundry bag will come in handy at the end of the trip when all my clothes are dirty.
3. Thermal shirt and black sweat pants for exercising. In case I don't get very sweaty, I can also use these as layers under other clothes to keep warm.


The Second Layer

1. A small loofah and a super absorbent towel. The towel is about the size of a hand-towel, but I can dry my entire body with about half of it. I bought mine in Japan, but you can find these towels in most department stores and eBay. If it's still wet at the end of the trip, I can just hang it over my carry on while I travel instead of soaking the inside of my luggage.
2. Thermal underwear. These will be my pajamas, and also a base layer if I need it.


The Third Layer

1. Two pairs of skinny jeans.
2. A black long-sleeved shirt to go under things.
4. A taupe hip-length long-sleeved shirt.
5. A long-sleeved animal print dress.
6. A casual long-sleeved blue dress.
7. A black hip-length long-sleeved shirt.
8. A taupe turtleneck.
9. A green striped hip-length sweater vest.
10. A Mary Kay stand-able mirror. (In case there is limited mirror space.)
(Notice that all my shirts are hip-length. This is to keep my butt warm!)


Inside the Big Purse

1. My small backpack travel purse with lots of pockets. (Inside I have a sewing kit, some bags of tea, bandaids, vitamins, tissues, etc.)
2. My quart-sized toiletries bag. Always keep your toiletries bag inside your purse (not your luggage) for easy access during security checks.
3. My ipod, phone, and camera chargers inside a compact-able shopping bag.
4. A taupe fleece hoodie.
5. Fleece-lined wool hat and mittens.
6. A fold up raincoat. (Doubles as an outer to go over my winter coat during blizzards.)
7. An inflatable neck pillow with eye mask and ear plugs in the pocket.
8. A "Patagonia"super light-weight compact-able down-filled winter coat.
9. Taupe pashmina scarf.
10. Velcro wrap-around earmuffs.
11. Alpaca sweater.


I still have plenty of room for some last minute items like glasses, small travel flatiron and hair dryer, extra fleece hoodie, etc.

So, hopefully that gives you an idea of how to pack warmly, fashionably, and cheaply this holiday season!

The End.


Tuesday, October 22, 2013

Make Your Own Convenient No-Sew Reusable Napkin System in Less Than 20 Minutes!

If there's one thing I hate, it's buying paper napkins and paper towels. I always end up forgetting to buy them when I'm at the grocery store, or else forgetting that I bought them last time and having bazillions of paper towels cluttering up my precious under-the-sink space. I also really can't stand how much trash my husband and I create from just paper napkins and paper towels. Think of how many you use a day--not only for meals, but snacks, wiping things off, etc. It's a ridiculous amount. Last Saturday, I did something about it, and you can too! Apparently, a quick Google search will bring you to hundreds of other people who have had this same brilliant idea.

What makes my idea different is that my process only takes 20 minutes of your life and creates a reusable napkin system that is just as convenient as the paper ones!

All you Need:

1. Pinking Shears.
2. A clean old bedsheet.
3. Measuring Tape.


A word about the supplies above. Pinking Shears are those funky zig-zag scissors. People use them when they want to create a non-fraying edge to fabric without having to hem the fabric by sewing. You can buy a decent pair at Walmart for around $10, or ask your grandmother for one--every grandmother has a pair. It's a grandmother prerequisite. (Don't use the kind for scrapbooking, because they don't cut fabric very well at all.) Use an old bedsheet. In other words, DON'T GO BUY A BRAND NEW ONE. That defeats the purpose of "Going Green." If you don't have a bedsheet to spare, use random cotton fabric scraps, or else if you absolutely have to buy one go to the thrift store. Let's use what we have already instead of creating more trash.

Now you need to figure out the correct measurements to your liking. I am too lazy to make big ol' 12-14" napkins because when they are that size they need to be folded before they are stacked. Yeah right. Not happening. Also, you are going to want to measure the entire piece of fabric to see if it is closest to a multiple of something. In other words, if your sheet is 60" across, and you are making 10" napkins, you can make six napkins across without any waste. If you are using bolt fabric that someone gave you, that kind of fabric is usually 44-45" across, so if you made 11" napkins, you could get four of them across. Make sense? My fabric was 52" inches across (I had a big scrap), so I decided to make 10" napkins. I cut a little slit at 50" and then ripped the fabric down the length of it instead of cutting: (1) it saves time (2) I was sure to get a straight line.

(The picture below just shows you what 10" looks like compared to a folded paper napkin.)


From there, I measured the fabric the other way and got 64", so I cut a little slit at 60" and ripped it down the length. When I finished ripping I had a piece of fabric that was 50" x 60". 
In other words: 30 napkins.

From here, you can just cut the edge of your fabric all the way around with the pinking shears. However, if you want to save time, do my little trick: Fold the fabric in half and then half again. This creates four layers. (My pinking shears can cut 4-6 layers of material, so this was perfect.) Smooth out any wrinkles and then cut the two sides of raw edges. This creates the same amount of cutting in 1/4 of the time!


From here you can painstakingly measure 10"x10" and cut, measure 10"x10" and cut, or you can do my time-saver method below! 

Lay your tape measure just above one of your newly "pinked" edges and make little cuts at every 10" or 11" measurement. Then move the tape measure up a few inches as pictured below and cut from the little cuts you just made to the designated measurements on the tape measure. Don't worry about your lines being perfectly straight, just do them as straight as you can.


Move the tape measure up a little and do the same thing.


And again.


And now you are done with that series of cuts. 


Now stack 2 or three of these strips on top of each other and do the same cutting technique going the other way to create squares.

Notice that I have two and a half napkins forming. Remember how my fabric was 50" wide? When folded in half, it becomes 25". If you have a measurement with an odd number followed by a zero (30", 50", 70", 90", etc.), make sure you leave the "half" part on the folded side. Otherwise, you will have a bunch of half napkins!


Aaaaand (Blogger put my picture in sideways) You're done! You can use them for normal napkin use, or you can even clean surfaces with them like paper towels! Plus, they don't rip like paper products do, so you can use fewer of them at one time.


How to Put Your New Napkins in an Old Napkin Holder:

You probably have noticed that these napkins are a bit bigger than the folded size of your paper napkins. Don't worry, you don't have to fold them individually to get them to work in your napkin holder. All you have to do is fold them all together a little bit on one side. 


Then, put that folded side down into the holder. To get one napkin out at a time, simply grab one napkin and lightly and quickly tug-tug-tug at it until it comes out. You may have to practice this a little because if you grab one the way you grabbed the paper napkins, they will all come out at once. Don't worry, it works really well once you get the hang of it. (One other advantage to pinking the edges rather than taking hours and hours to hem the edges is that you can fit more napkins into your holder at a time.)


Goodbye old paper towel dispenser! You were breaking anyway!


Now to Make a Napkin "Laundry Bag":

I didn't know what else to call it but a laundry bag. In order for this whole fabric napkin thing to become just as convenient as its paper alternative, you are going to need a place to put the dirty ones until they can visit the washing machine and dryer. They need to be kept separate from the rest of the laundry so that they don't go missing/end up all over the house. This can be done in several ways, I'm just going to give you two. Be creative!

The first thing I tried was a lingerie bag I bought at the Dollar Tree. Any small mesh bag will work. Make sure it's mesh so it can breathe. Sometimes napkins get wet, you know. In other words, DON'T make your napkin laundry bag out of a plastic bag...unless you like stinky mold.


This is what it looked like when I hung it on a nail on the door under the sink. It was kinda too long and took too much effort to open and close every time we had a dirty napkin. If you aren't as lazy as me, then this system is fine.


However, I knew I wasn't going to keep that effort up for very long, so I took some yarn and some plastic canvas, and constructed this little box and hung it on the same nail. (This part takes about 45 minutes, though.) Voila! Easy and Doable! You could achieve this same convenience with any mesh or holey box on a nail under your sink. You don't have to make it, you know. Just use what you have! That's all I did.


**Doing this project with your kids (that are old enough for scissors) is a really great way to help them see the importance of reducing trash, saving money, creating something, helping the environment, and saving time!**


The End!