Tuesday, April 29, 2014

Hobbit Cloak...or How to Make a Birthday Present for Your Type 2 Sister

If you know anything about "Dressing Your Truth" types (which you can learn about here), you will know that Type 2's are intensely sentimental. I don't mean that in a wishy-washy way, I mean that they have intense emotional connections to people, the past, the future, animals, points-of-view, etc. far more than the other types. My sister is such a person. Therefore, for her birthday I decided to hand make her a hobbit cloak because I knew it would remind her of when we were kids.


I found this awesome elvish/hobbit material at a thrift store which is where I got the initial idea for my sister's birthday. I looked up "hobbit cloak" blogs and found this really good one, but. . .you know me. I can't follow the rules entirely.


Up close you can really see how perfect it is. It looks like the same exact material as in the movies.


I wasn't going to be able to make a long cloak because the fabric was less than 2 yards long and a lot of that would be for making the droopy hood. I measured out 1 yard and decided that that's how long the cloak part would be. I used my cutting method that I've used before when making napkins. Simply cut a small cut where your measurement is, then move the tape measure up, and then cut from your first incision up to the tape measure. Keep doing that till you get to the end, and you are sure to have a straight line.


I set the cloak part aside and folded the remainder in half. I figured out that I wanted the hood to be 36" around the face to make it extra drapey, so I measured out 18" (half of 36") and cut up to the fold.


Here is the 18" part cut off.


Next I figured I wanted the part around the neck to be 22", so I measured out 11" (half of 22") and cut.


Here is a close up of the cut.


Then, I just connected the end of the "neck" cut to the point of the top of the hood and used my tape measure as a straight edge. This side of the hood will be the part that lies against the back from the nape of the neck down the back.


Here is the cut hood.


Then, in keeping with the elvish look, I used gold thread.


Here is the part I sewed.


Then, I folded the cloak part in half.


I took a flexible tape measure and measured a curve of 11" in a folded corner.


Then, holding the tape measure in place, I quickly followed the tape measure's curve with my scissors. This is a very unorthodox way of doing this, I realize, but it's super quick and it works!


This is the neck hole.


Before I opened the cloak up, I put a pin right in the top of the fold. After opening the cloak part up, I matched the back of the hood with the pin. You can see me pointing at the pin in this picture.


I first pinned the middle in place and then pinned the edges of the hood to the edges of the cloak. Then I filled in the rest of the length with other pins. This assured that I wouldn't run out of fabric on either side.


After sewing the hood in place, I folded the cloak in half again, eyeballed a curve, and cut the corners off.


Here is the finished cloak. (Incidentally, I got that dress from "Twice." To get a free dress, top, or bottom go here and sign up for $10. Then, download the Twice app to your iPad or iPhone for another $10. Then, go here to find a coupon and you can usually get an additional 15% off!)


(Later I reinforced the broach area with a zig zag stitch back and forth to keep the fabric from fraying from the tension.)


The End!


Wednesday, April 23, 2014

Dressing Your Truth Experiment: How Do You Reflect Light?

If you've been reading my recent posts, you have learned about how I'm doing this new DIY makeover called "Dressing Your Truth." You can sign up here.

In "Dressing Your Truth," Carol Tuttle talks about the four "energies" that make up human personality. In other news, I watched an episode of "Cosmos" about the light spectrum and how different elements reflect light with unique spectral patterns. This made me wonder about the four energies as they translate into elements (gas, liquid, fire, earth) and I wondered, "What is my spectral pattern and how do I physically reflect light?"

I'm a big nerd and I wonder these kinds of things. . .

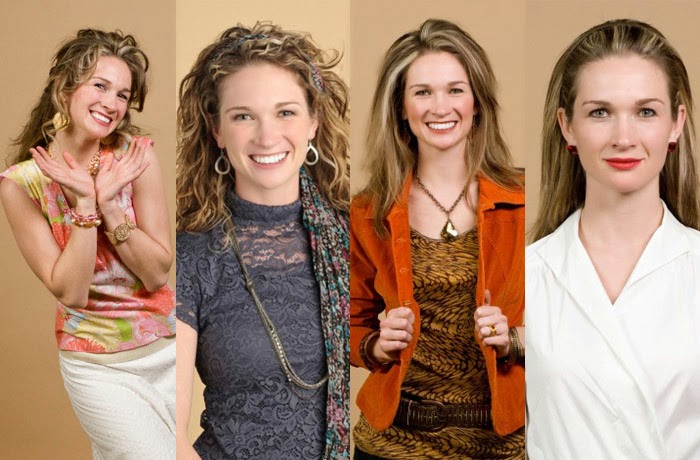
Here is an example of how Carol's daughter, Anne, looks as the four types. It's a little hard to tell her energy type simply because she is young and can get away with more (which is why magazines always show-case clothes on teenage models). She looks to be faking the 1,3, and 4 looks--making them look "off" on purpose, because she looks so beautiful and comfortable as a Type 2. Notice how her skin tone looks too pink as a 1,3, and 4. Notice also how the background in the 2 picture is distinctly different from the rest. She reflects light best as a 2.


Here is an example of how Carol Tuttle herself reflects light. She is older than her daughter (as all mothers are!), and you can really start to tell how uncomfortable she is as any other type besides a 3. It almost looks like she is trying to make the types 1,2, and 4 look bad, but she isn't. That's just how her Type 3 energy "shines." Notice how her skin looks washed out in every picture except the third one. Notice also the backgrounds. The 1 and 3 looks have the highest contrast for her face because she is a higher energy, but she reflects light best as a 3.


(Disclaimer: If you view these on an iPhone, the pictures may be out of order. The "Type 4" picture is the one of me in the black dress.) Lest you write this off as a gimmick done with high tech camera tricks, I decided to do my own experiment. I took all these pictures after a full day of work with the same lighting and flash and no digital touchups whatsoever. All these pictures were the first picture taken. Furthermore, my Type 4 picture was taken after an hour long massage (lying face-down!) with absolutely no makeup touch ups except lipstick. Not even blotting.


Isn't it freaky how all three of the first pictures have a similar background, but the fourth is warmer? I look very grey in the first three pictures, but my skin looks alive in the fourth picture. You can't really see my facial features except in the fourth picture. I also look thinnest in the fourth picture, even though that dress is very baggy. One of the weirdest things I noticed is how frizzy my hair looks in the first three pictures. I honestly did the LEAST amount of touchup or planning for the fourth picture (my face is a little shiny as a result), yet that is the one that looks the best. That's one of the perks of "Dressing Your Truth: Effortlessness.

Also, I am making a similar face in all four above, but I just look awkward in the first three. I didn't even realize that till after. Let's examine that "face" phenomenon for a second. I went back after taking these pictures and tried retaking them with more expression pushed through to see what difference it would make. Here are the first two looks with more effort put into my smile:


It took a lot of effort to try to make my eyes and whole face more "smiley" to support what I was wearing. If I had to keep that up all day, I would be exhausted after an hour. 

Okay, so. . .I hope this helps to show you that when you aren't "Dressing Your Truth" looking good takes way more effort with way less payoff.


How do you reflect light? Start doing some experiments at home. You will surprise yourself!

The End


Sunday, April 20, 2014

Dressing Your Truth on the Cheap

This is a short one to show that "Dressing Your Truth" doesn't mean going out and spending tons of money on a new wardrobe. Once you know what you look best in, the items just seem to appear as if by magic and you end up spending less because you can go straight to the sale rack and find what you want on sale.

(Again, if you don't know what "Dressing Your Truth" means, refer to my former posts, or go here.)

All of the looks below cost less than $30 total (including jewelry and shoes). I highly recommend waking up early on Saturday and going to yard sales because the clothes are even cheaper than the thrift store and they usually tend to be nicer because people are trying to make a buck (whereas thrift stores carry what people throw out).


1. Gap leather jacket - $5.00 - yard sale
2. "Peace, Hope, Love" tank top - $2.00 - Rue21
3. Neon pink pants - $5.00 - Walmart
4. Silver shoes - $5.00 - Rue21
5. Cross necklace - $1.99 - 599fashion.com
TOTAL LOOK - $18.99


1. Striped sweater - $2.00 - Rue21
2. Black tank top - free - from a friend
3. Black pants - $5.00 - Walmart
4. Black ballerina flats - $10.00 - eBay
5. Bold stud earrings $1.99 - 599fashion.com
TOTAL LOOK - $18.99


1. Striped blazer - $9.42 - eBay
2. Silver tank top - $2.00 - Walmart
3. Red pants - $5.00 - Walmart
4. White leather and silver embellished flats - $2.50 - thrift store
5. Silver bib necklace - $1.99 - 599fashion.com
TOTAL LOOK - $20.91


1. Striped maxi dress - $11.50 - eBay
2. Purple cardigan - $6.00 - eBay
3. Silver shoes - $5.00 - Rue21
4. Chevron necklace - $1.99 - 599fashion.com
5. Silver bracelet - $1.99 - 599fashion.com
TOTAL LOOK - $26.48


1. Black T shirt - $2.00 - Walmart
2. Red skinny pants - $5.00 - Walmart
3. Clark's Artisan Diamond Cameo booties - $5.00 - yard sale
4. Chevron necklace - $1.99 - 599fashion.com
5. Silver bracelet - $1.99 - 599fashion.com
TOTAL LOOK - $15.98


1. Yellow T shirt - $2.00 - Walmart
2. Blue embellished cropped shirt - $2.00 - Rue21
3. Jeans - $5.00 - Fashion Shack
4. Bracelet - $1.00 - (I bought it in Korea and spray painted it blue)
5. Black flip flops - free - from my mom years ago because they didn't fit her
TOTAL LOOK - $10.00


The End

Friday, April 18, 2014

Refashioning: Shortening a Dress

Okay, Kiddies, so here is another way to alter your garments. This post is a continuation of an on-going process to revise my wardrobe so that 100% of it will look good on me every day. To learn about my journey to find this process, go here.

If you would like to join "Dressing Your Truth" at a discounted rate of $99 (rather than the normal $297) click here.


So, recently, I have joined a group of older ladies who go yard saling on Saturday mornings. It's fun and educational. If you are worried about not being able to spend money on revamping your wardrobe, I highly suggest yard saling. It's even cheaper than the thrift store and you can find much cooler stuff, because people are trying to make a buck off their yard sales, whereas thrift stores carry the clothes people throw out. Anyways, I found this super cute bright red dress at a church yard sale for $2.00. It is lightweight polyester. Notice how the bright red clashes with the colors in the mess of clothes behind it. That stack was part of my purging process (most of them being sold on eBay or given away). . .This dress was cute, but way too long--like mid-calf. Therefore, I cut off about 7 inches.


I had a friend ask me one time what the "surger stitch" was on a regular sewing machine. I don't know if it's called a "surger stitch" or not, but when I use that term, I mean the stitch on the left of the red dot below.


I used that stitch to keep the cut edge of the dress from fraying. (This is a faster alternative to double folding a hem which takes forever because you have to fold, press...fold, press. No thanks.)


Then, I folded the dress up on the wrong side measuring with two fingers and pinned it.


Then I hand-stitched an invisible hemming stitch in red thread. I could have done this much faster on the machine, but. . .I didn't.


As the last step, I pressed the hem just to make I flat, but you don't have to if the fabric lies flat. This whole process took about 10 minutes.


The End!

Wednesday, April 16, 2014

Refashioning: Quick Alterations for Tank Tops and Pants

I have an unlikely body for a Type 4. (If you don't know what that is, go here.) Most Type 4s have "T" shaped bodies. I think this is where my secondary Type 1 comes in, physically. I have what some would call a "cuter" frame. I have called it in the past a "crappy" frame. However, I am learning to love it. Especially now that I know exactly how to dress to look good and don't have to guess anymore.

(Really, click on that red "here" up there. You're missing out if you don't. . .Unless you're a man. In which case, why are you reading this?)


All righty then. So, when I shop for tank tops, the classic "Jessica problem" is for the straps to be made for a football player and not me. This is how I fix it. I put the tank top on, and pull the straps up off my shoulders till the neckline hits where I want it. I measure that extra portion of strap with my finger. Then, I take the tank off and cut the strap right at the base on the back of the shirt. Then, using my fingered measurement, I cut that much off the strap and then sew the end back on. (Sorry, I forgot to take pictures while I did this, because I was powering through. A lot of the next few blogs actually happened on the same day and stuff.)


Here is a close up of the sewed-back-on strap. I used a zig-zag stitch.


All right. The next one you will probably think is weird, but I'm gonna post it in case it gives someone an idea. When I buy skinny pants/jeans, I buy them at least one or two sizes too big, because I don't like when pants are super super tight-I-don't-care-how-skinny-you-think-you-are. This upsizing means, that they are usually too big in the waist. Alert readers will recall a fix to a similar problem here. But, let's just say you are fresh out of elastic and your pants are made of jersey. Here is another method:

You can see that these pants are too big in the waist. It looks like I'm stretching them, but I'm not. I'm just holding the waistband. 


I turned them inside out, put them on, and then pinched both sides till the waist band was flush with my waist. Then, I pinned one side carefully and took them off. 


Then, I just sewed up the sides.


They stay up now!


(Later, I took in a little more from the inseam because they were still too baggy in the "crotchal region," so...There you go!)


The End!