Showing posts with label autumn. Show all posts

Thursday, September 7, 2017

Make Your Own DIY Pumpkin Trunk or Treat Candy Collection Box for $3.00!

My pastor's wife asked me to make a box to collect candy for our church's Trunk or Treat. Immediately, I knew I wanted to make a box that looked like a pumpkin. I searched Pinterest, but I couldn't find any. . .

And, anyways, I already knew what I wanted to make in my head:


This box doesn't have to be just for candy collection. You may be a teacher and want to make one for your classroom. If so. . .

This is how to make one yourself!

Total cost: $3.00!

The large box was one that we had at church from some shipment or other. I went to Dollar Tree and found two rolls of orange wrapping paper, and one leafy garland.


The first step was to turn all the flaps of the box so they were out.


The next step was to make knife pleats folded like this: (You can see other pictures of these pleats in other pictures, don't worry. You can also Google "knife pleats - casual.")


Then, I rolled tape like this. . .


And folded them up.


The rolling of the tape was taking too long, so I just started taping the rest of the pleats like this:


This is one side completely finished. (Be patient! It takes a while. Also, don't press down the pleats any farther than about two inches from the top. You want the rest of the paper to be folded but not creased:


Here is a back-side view of the pleats. See how they are folded from this angle?


Okay, once that side was done, I started pleating the other side of the paper.


This is what one whole roll of wrapping paper looked like. See how the middle of the paper is only slightly folded, but only the outer sides are pressed into pleats and taped?


Then, I turned the whole box upside-down and started taping the folded paper onto the bottom left side of the box. (I didn't put any paper on the back, because this box was going to be against a wall. Feel free to put paper on the back of yours if you need it. In that case, buy three rolls of wrapping paper!)

[Not pictured]


Then, I turned the box on the side that will be against the wall, and taped the paper to the box around the bottom of what would be the front.


This next step is VERY important if you want your pumpkin to have "body" and stick out like a real pumpkin: Turn the flaps of the box down. This is a little awkward as the wrapping paper will naturally be creeping up the sides. You kind of have to finagle it so you don't crush the paper as you do this.


Then, I taped the top of the wrapping paper into the top edge of the box. The paper covered exactly half of the pumpkin! I got lucky!


At this point, you can stick your hand inside the paper and sort of push it out from the inside to get it to round out like an actual pumpkin. If you want to fill it with packing peanuts or something light and puffy, feel free. I didn't.


Then, I got smart and instead of pleating one side of the paper at at time, I pleated both sides at the same time. Much faster and easier!


Then, I taped this other piece of paper to the box, starting with the box completely upside-down. . .


And then turning it on its side to finish taping the bottom part around to the front.


It's starting to look like a real pumpkin!


Then, I Googled pictures of pumpkins to make the stem, and free-hand cut one out of a piece of green paper. (If you don't have green paper, you could also paint the stem green.)


Then, I traced the stem on the back flap of the box. . .


And cut it out.


Then, I glued my green paper to it.


To keep the stem upright, I grabbed one of the empty wrapping paper tubes and taped it to the back.


Then, I added the leaf garland. (First I taped two of the leaves to the stem, but the tape kept coming off, so I stapled them.)


The tape on the wrapping paper was starting to pull away from the box, so I reinforced all the tape with clear packing tape.


Okay, now the box is done, but I wanted to make a little sign for people to know what the box was for, so I spent another $3.00 at Dollar Tree and bought this cute little owl and two fall leaves.


I also printed out a speech bubble for the owl to say, "Whoooo wants to help with Trunk or Treat? Deposit candy in the box below!"


The End!


Friday, November 22, 2013

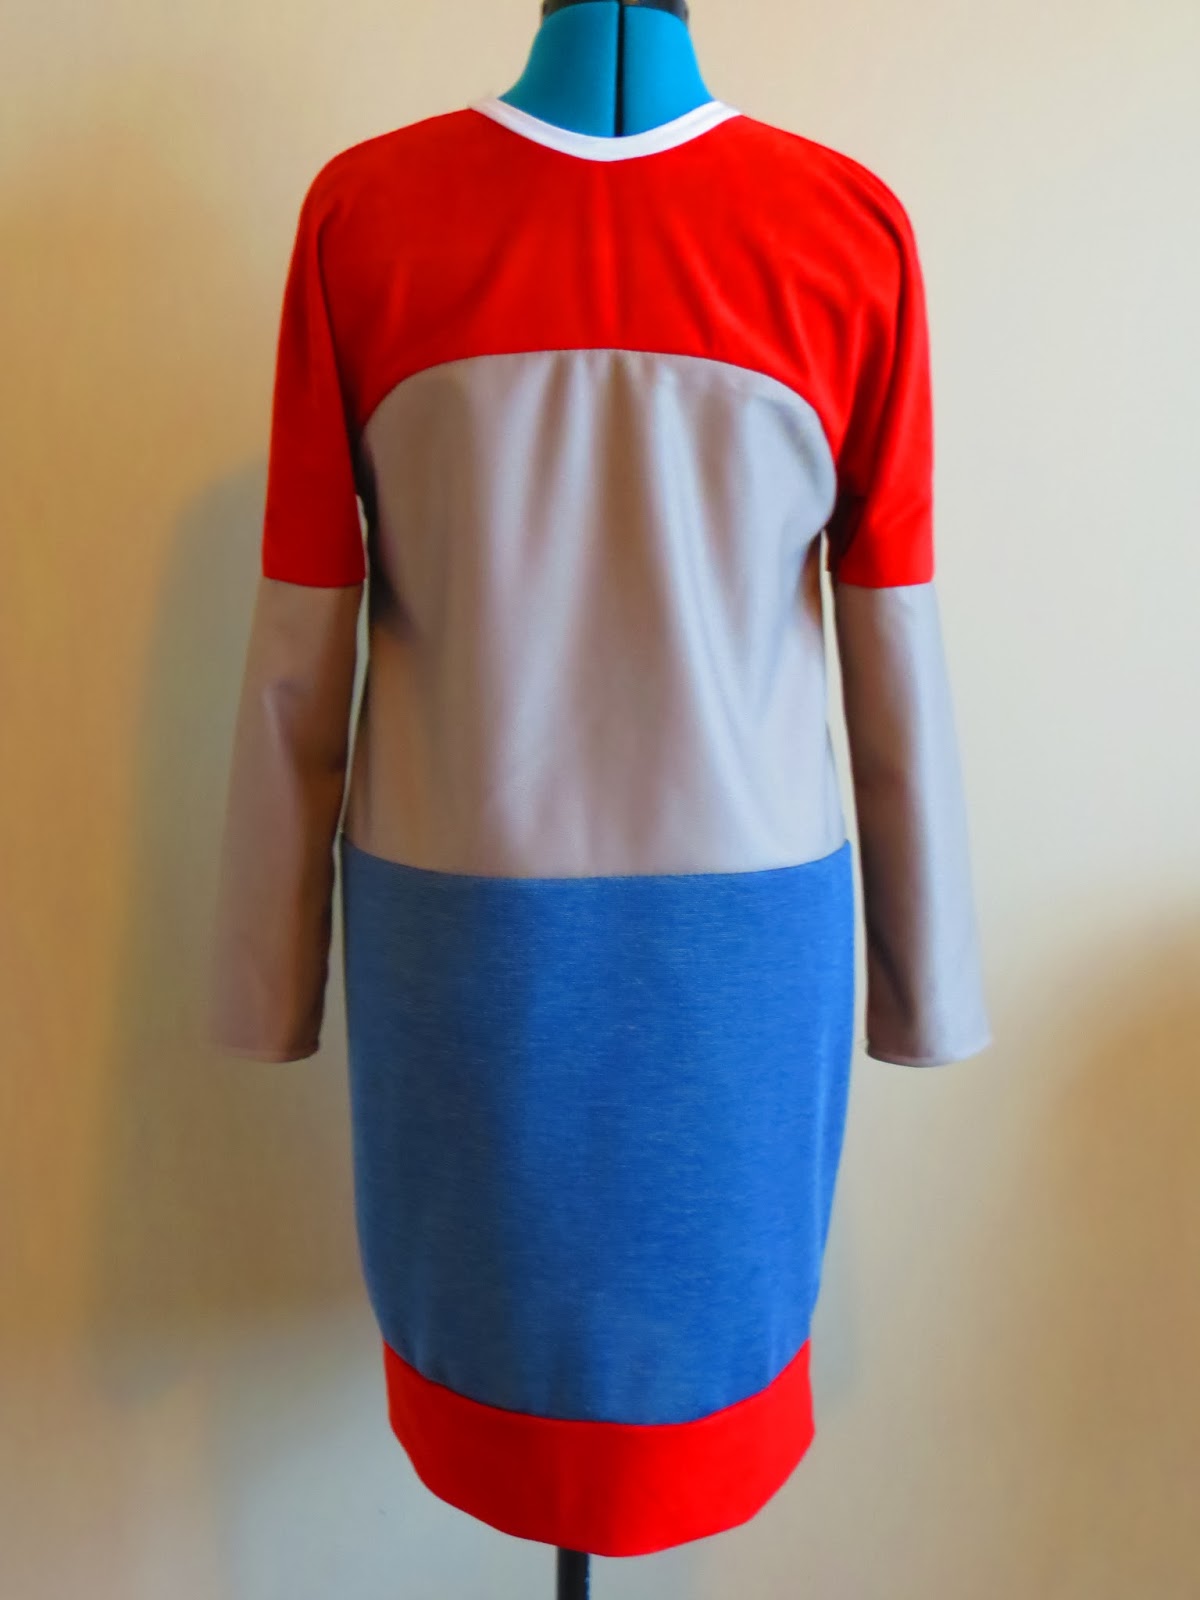
Two More Fendi Inspired Colorblock Knit Dresses - Teal, Tan, and Grey - Blood Orange, Plaid, Brown, Grey, and Tan

I love this Fendi dress. . .


. . .So I decided to make two more!


I don't know if you can tell from these pictures, but I took a little time to refine the shoulders/sleeves pattern and I brought the drop waist up a little from my last endeavor. I still like the first dress, but these ones are just a little more comfortable and fit just a little better. Once I was happy with my pattern, I simply cut out both dresses and sewed them together almost at the same time. This really cut down on construction time--doing two at once.


It's crazy how just changing the color scheme gives the dress a whole different look. I think these teal green/blues make the dress look sporty whereas my last one looked european.


This blood orange one looks bookish and Autumn-y.


The dark orange part isn't double knit. It's actually semi-stretchy faux suede. You use what you have!


The End!


Friday, October 25, 2013

How to Pack for Cold Weather

Since the holidays are coming up, and many people will be traveling, I thought I would take a minute from my packing (to visit Montana on a mission's trip) to show how a woman packing warmly doesn't have to pack a lot. The keys are to stick to one color scheme, pack lightweight yet warm fabrics like fleece and wool, and pack layers rather than bulky items. I've packed everything I need in a small rolling carry on and a large purse. (Incidentally, the carry on has a lock on it and an expandable zipper.)

The trip will last about six days, but with what I've packed, it could last longer because almost everything can go together in different ways. I'll dissect my carry on and purse in a second, but before I do, I want to point out what I will be wearing on the plane: Sketchers boots, a long-sleeved hip-length taupe shirt, orange skinny jeans, and a light taupe fleece vest. (If I get hot, I can take the vest off. I can also pair it with other items in my carry on later if I get cold during the trip.)


Now to dissect the carry on: The inside flap.

1. 5 pairs of fuzzy socks. These are essential for sleeping and really make a difference inside your boots when the temperature drops. They also dry within a day if you have to wash them in a sink.
2. 6 pairs of underwear and socks. (They can also be washed in a sink if needed.)


The Top Layer (sorry, Blogger put it in sideways)

1. 6 pairs of black and grey fleece-lined tights. These can be worn by themselves under long shirts and dresses or under skinny jeans for added warmth.
2. Running shoes inside a mesh laundry bag. I can use the shoes for exercise, but also as alternative footwear if my boots start hurting me. (Always bring an alternative footwear option. You never know how much you'll walk and your feet may need a break.) These shoes are Sketchers "Go Run" and they are super comfortable, but also squish up nicely into luggage. Also, the mesh laundry bag will come in handy at the end of the trip when all my clothes are dirty.
3. Thermal shirt and black sweat pants for exercising. In case I don't get very sweaty, I can also use these as layers under other clothes to keep warm.


The Second Layer

1. A small loofah and a super absorbent towel. The towel is about the size of a hand-towel, but I can dry my entire body with about half of it. I bought mine in Japan, but you can find these towels in most department stores and eBay. If it's still wet at the end of the trip, I can just hang it over my carry on while I travel instead of soaking the inside of my luggage.
2. Thermal underwear. These will be my pajamas, and also a base layer if I need it.


The Third Layer

1. Two pairs of skinny jeans.
2. A black long-sleeved shirt to go under things.
4. A taupe hip-length long-sleeved shirt.
5. A long-sleeved animal print dress.
6. A casual long-sleeved blue dress.
7. A black hip-length long-sleeved shirt.
8. A taupe turtleneck.
9. A green striped hip-length sweater vest.
10. A Mary Kay stand-able mirror. (In case there is limited mirror space.)
(Notice that all my shirts are hip-length. This is to keep my butt warm!)


Inside the Big Purse

1. My small backpack travel purse with lots of pockets. (Inside I have a sewing kit, some bags of tea, bandaids, vitamins, tissues, etc.)
2. My quart-sized toiletries bag. Always keep your toiletries bag inside your purse (not your luggage) for easy access during security checks.
3. My ipod, phone, and camera chargers inside a compact-able shopping bag.
4. A taupe fleece hoodie.
5. Fleece-lined wool hat and mittens.
6. A fold up raincoat. (Doubles as an outer to go over my winter coat during blizzards.)
7. An inflatable neck pillow with eye mask and ear plugs in the pocket.
8. A "Patagonia"super light-weight compact-able down-filled winter coat.
9. Taupe pashmina scarf.
10. Velcro wrap-around earmuffs.
11. Alpaca sweater.


I still have plenty of room for some last minute items like glasses, small travel flatiron and hair dryer, extra fleece hoodie, etc.

So, hopefully that gives you an idea of how to pack warmly, fashionably, and cheaply this holiday season!

The End.