Showing posts with label silk. Show all posts

Friday, January 18, 2019

"The One Sleep Eyemask to Rule Them All" 2.0 - New and Improved!

So, about four and a half years ago (has it really been that long??...Gosh, I'm old...), I made a pattern for what I deemed "The One Eyemask to Rule Them All." You can find it by clicking ---> here. (Actually, you need to click there if you want to try this project, b/c it includes the pattern I used. And it's free.) 

Anyways, if you read that last post, you will learn that I am a really strange sleeper. I CANNOT sleep with any light nor sounds of any kind. I also...prefer to have my ears covered. I know. It's weird. Guess what. It's okay. I fixed the problem by buying an ear-covering-eye-mask in Korea when I lived there years ago. So...I'm not the only one! Someone else has this problem too!

Anyways, all that to say...my former mask--patterned after the Korean mask--was alright, but fell short in one major area: I woke up every morning with deep creases on my face made from the red binding I'd added around the outer seam.

Okay...so...why it took me four years to revamp it, I don't know, but anyways, the point is I did it, so without further ado, let's get to the new project.


To rid myself of the weird creases every morning, I decided to choose 100% silk satin. Silk has long been lauded as a luxury fabric and for good reason. Not only is is durable while being lightweight and aesthetically beautiful, it also is a great surface on which to sleep. (Remember when I made that silk satin pillow case? No? Well, click --> here then.) Anyways, I made a silk pillow case from an old prom dress that I never wore and couldn't sell online. I've been sleeping on it every night since I made it, and it's fantastic. Best pillowcase ever! My hair is far less frizzy with less breakage and I have fewer breakouts, just to name two reasons for why I am such a believer in sleeping on a silk surface.

A word about 100% silk satin. It's a luxury fabric. That means if you go to the fabric store to try to track it down, you are going to pay a pretty penny for a tiny bit of it. Instead of that mess, consider finding an article of silk satin clothing from the thrift store. The top below is a tunic that I actually bought on sale at a retail store, but it doesn't fit me very well. I had tried to sell it on Poshmark. It sat there for about a year with no takers, so I gave up and decided to repurpose it for my sleeping purposes. I'm glad I did. (You can see that I already cut a sleeping mask out of the bottom hem at the start of this project. That's because I wanted to trial run this project before promoting it to make sure it actually worked. Boy am I glad I cut that stupid shirt up! I love my eye mask! So...this project is really my making a few more masks that I can alternate when one of them has been washed and is hanging to dry.)

Okay...so...for reals this time, let's talk about the project and how you might replicate it.

You need: silk satin (if you can't find 100% silk satin, try just 100% non-satin silk. If you can't find 100% non-satin silk, try a polyester satin. It's not as good, but it's better than moisture-stripping cotton.). You also need black-out fabric. I used extra curtain fabric. It doesn't have to be curtain fabric, but curtain fabric is really really good for this because it is very opaque. You can easily test fabric by holding it up to the light. If it doesn't allow light to pass through, use it!

You also need: elastic, Velcro, glass beads (substitutes will be mentioned later), and....a stapler!


First, cut out both fabrics using the pattern in the link I already gave you at the top of this post. You need to add a seam allowance around it. I eyeballed about 1/4" around. You can see in the pictures below.


Then, with the right sides of both fabrics together, pin them.


Cut a two lengths of wide-ish elastic. (There are four in this picture because I actually made two eye masks at once.) These are roughly 6 inches long.


Open the sides of your pinned mask and stick the elastic in. (You can actually do this before you pin the fabric together in the first place.)


Then, stitch around. Make sure to leave an opening at the top middle of your mask so you can turn it right-side out. The picture below shows me back stitching over the elastic. I did this to assure the elastic was secure in the side seam.


Then, cut little notches around the curviest parts of the seam. This helps it lay better when it's right-side out.


Turn the mask right-side out.


Okay, first of all, see how there is an opening at the top middle of the mask? Make sure it's the TOP of the mask you leave the opening in and not the bottom. 

Okay, so get your pattern back out and notice where the lines are drawn. This sections off the "ear" parts from the "eye" part.  Put pins on either end of that line.


Then, just stitch straight from one pin to the opposite pin.


Then, turn it upside down and sew about a 1 to 1 1/2" line straight up the middle. This is where the mask will hit your nose and nose bridge.


Turn it back around and measure about 1 to 1 1/2" out and above the nose line to make eye lines. You may want to actually hold the mask to your face (BEFORE PINNING!!!) to see where your eyes hit in relation to the nose line. 


Then, stitch roughly 1 inch lines.


Okay, so now let's discuss filler options. You know how fancy spas have those eye masks that have fancy things in them like lavender and seeds and whatnot? So...you can totally use lavender...or rice...or seeds...or whatever. I used glass beads and here's why: Because I wanted to be able to throw my masks in the wash! Glass beads have a nice weight to them, so you get that spa-like feel, but you can also wash your mask in your weekly laundry and it won't get gross bacteria buildup or...mold! Ick!

A word about glass beads: They are awesome, but I do have to say that glass retains a colder room temperature than...say...cotton or lavender or other fillers. So, it's really nice to put a glass bead-filled eye mask on in summer. It's very refreshing. However, right now it is winter and so I will say, it takes a few minutes against my skin for the glass beads to stop being so dang cold. If you are a light sleeper, this can rob you of those first crucial moments when you are trying to fall asleep, so...what I do: I read the Bible before falling asleep. While I'm reading, I put the eye mask under my body, so it can heat up for a few minutes. Then, when I put it on my face, it's not so jarringly cold and it feels quite nice.


Okay, so, as I said, I made two masks at once. I actually tried to fill the other one with poly-fill stuffing. Well, after I filled it, I held it up to my face, and guess what...I could still see light peeking through the bottom. When I held the glass-filled one up, I could manipulate the beads to block all the light out. Also, the fact that the beads have weight keeps the fabric down, so less light comes through....Suffice to say, I pulled all the poly-fill out and filled the second mask with beads as well. 

If poly-fill works better for you, though, go ahead and use it. Use whatever filler you want.


Then, sew the top "filling" gap up.


Okay, so now comes the adding of the Velcro. Almost all Velcro you buy nowadays comes with a sticky backing. I'm not sure why companies think this is a good idea. First of all, sticky back Velcro is not permanent, no matter how sticky it is. It comes off in just a few washings. Furthermore--and if you sew at all, you will hear me on this--it's SUPER annoying to sew through! It gums up your sewing machine and the gum NEVER comes off your needle! Then you try to hand sew it, and guess what...same problem: You have to throw your needle away because it's covered in gum.

I am going to save you a ton of time and heartache with a simple hack.


First of all, take the strip off the backing...


Then, fold the edge of the elastic down toward the side that will receive the Velcro.


Stick the Velcro on over that fold...


Then, COMPLETELY BYPASS THE SEWING and use a stapler!

That's right! I said a stapler! Staple it just like I have it below and your mask is done! No messed up sewing machines. No unsalvageable needles. It's permanent, washable, and it takes three seconds! 


So here is the finished mask. Hurray for light/cold ears/crease-free sleeping!


The End!


Saturday, October 7, 2017

Refashioning: An Indian Sari into a Western Duster Cardigan

Okay, so this post is going to be a project that is TOTALLY outside my comfort zone.

But. . .I did it anyway.

I was in Texas recently and noticed that these kimono/caftan/cardigan/duster/robes were everywhere.

Like. . .everywhere. On people. In stores. In shop windows. Everywhere.

I studied a few of them and saw that there was really nothing to their construction--just a few seams. My first inclination was to hate them--Not on other people! On many ladies, they looked super chic and perfect. But, I am not a flowy kinda girl, so I just sorta noted them as something I would never wear and tried to move on.

Here are some examples. They come in different fabrics, but mostly airy thin, non-stiff fabrics like chiffon and silk. They also come in different lengths. This first one is shorter.


But they also go down to the floor like this one.


Some of them have a bit more structure like this one.


I did notice that most women who wore them tended to wear all black under them. . .


. . .That was when I started to consider possibly making one myself.


Once I got back home, I remembered that I had this black sari that I'd bought off the streets in Jaipur, India about eight years ago. I've collected about five or six saris from my various travels, but this one has always been my favorite. (After learning about "Dressing Your Truth," now I know why!) 

Anyways, another point to make is that embroidery is currently a VERY hot trend (especially rosettes), and this sari is covered in embroidered rosettes!


But did I really want to cut it up? I mean. . .what if I ever have some international event that requires dressing up in cultural garb? Will I have missed my chance to wear this amazing piece?

Then, I thought, "Jessica. . .when are you ever going to wear this? You live in the Bible Belt and everyone would probably freak out if you showed your mid-riffs.

"Plus, you're white as a sheet, so. . .You will just look like a poser anyway."

Good point!

So, I decided to see if I remembered how to put a sari together--sort of as a last "Hurrah" for my poor sari before I started cutting it all apart. . .I learned how to do this from an Indian lady I met in Singapore.

Well, I remembered!. . .Without any outside help! Not bad for a white girl who last did this probably nine years ago!


I love how saris always make a lady's butt look amazing. It's a little hard to see here as my dress form doesn't have legs, but. . .just take my word for it!


(If you ever wondered what goes under a sari, this is it. Basically, the sari is a huge long piece of fabric and you wrap it and fold it and tuck most of it into the waistband of a petticoat like this red one.)


Okay, this next picture denotes about an hour's worth of time as I was playing with the sari and seeing how much fabric I had to work with and then telling myself to go for it and start cutting. . .and then talking myself out of cutting it. . .and so on.


So, to get myself motivated, I started to hem the back bottom part of the section that gets thrown over the shoulder. (That is the fanciest part of any sari.) It needed hemmed anyway, and it helped me to get over the fear of refashioning it.


My first step was to sew the raw edge under about 1/2 an inch. . .


Then, cut off the excess. . .


Then, fold it under another 1/2" and sew it down again. It's kind of a pain to sew the seam twice, but chiffon doesn't iron very well, it shifts a LOT, and you do have to hide the raw edge because it unravels like crazy. Folding, sewing, and then folding and sewing again is the only way to make sure everything stays in place.


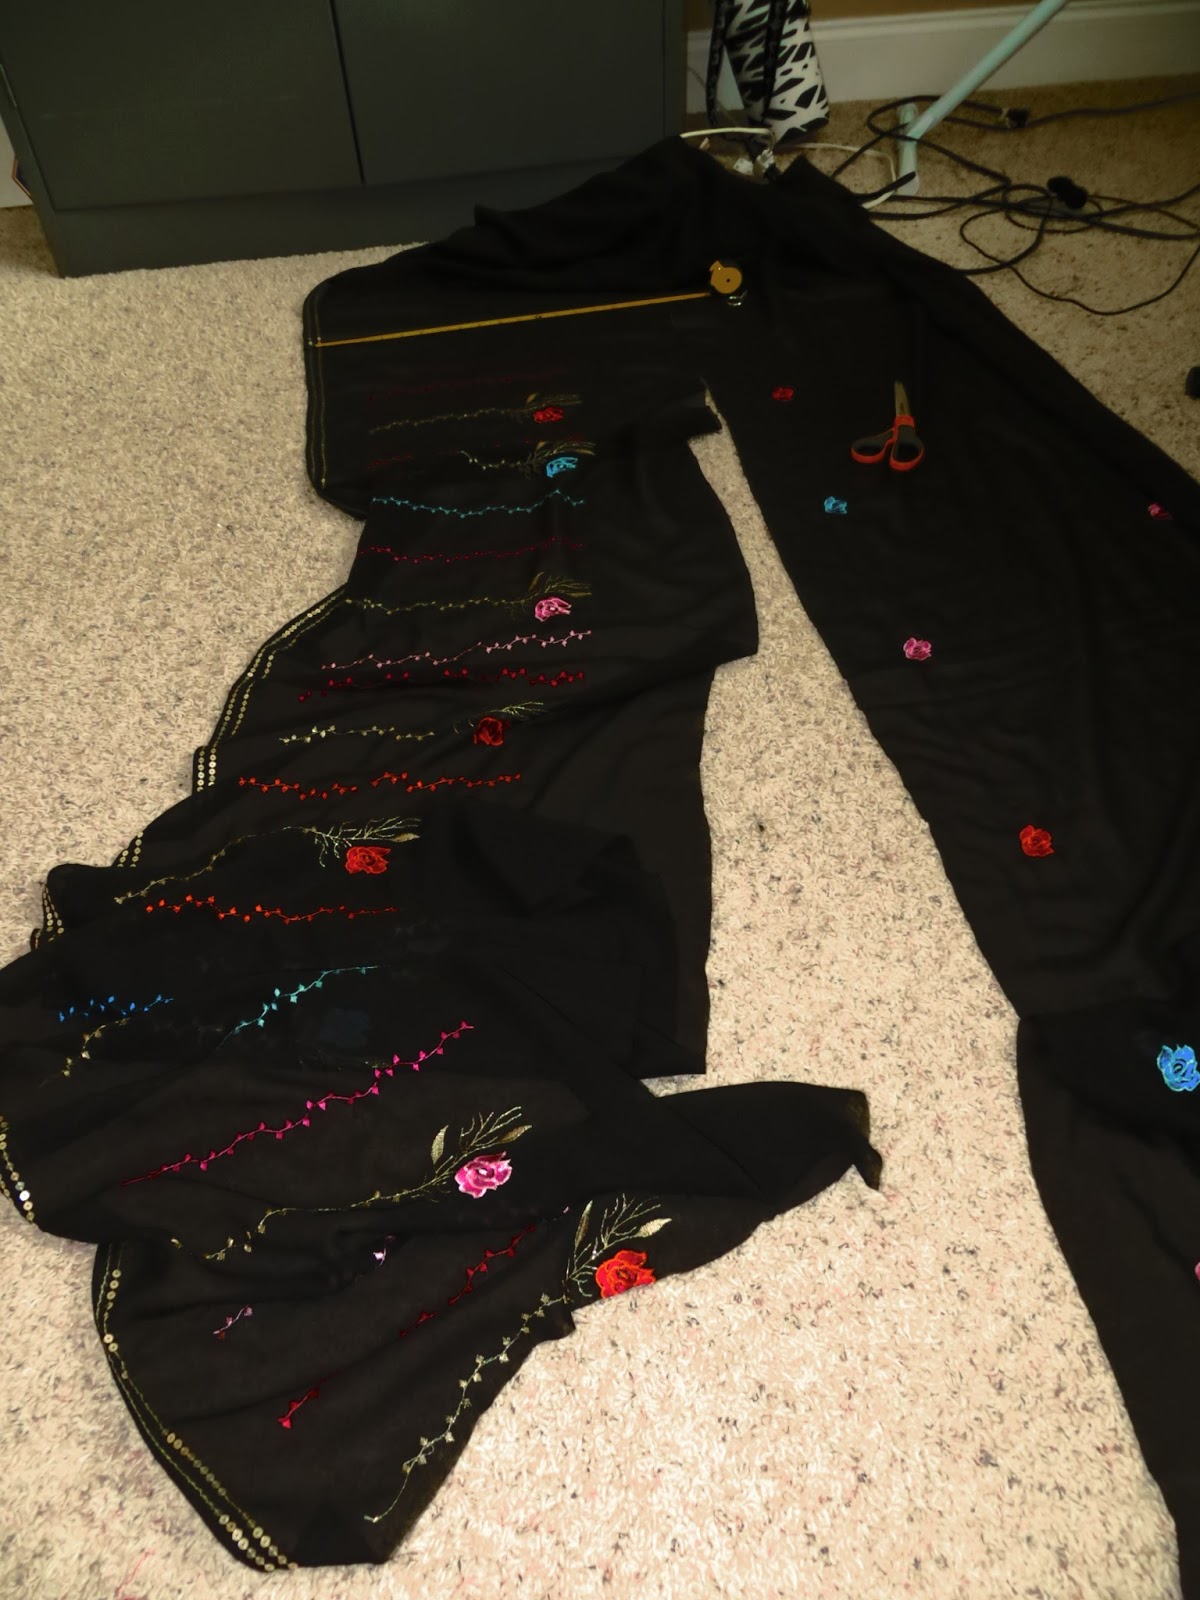
Okay, once that edge was hemmed, it was time to start cutting. I found that the embroidery only covered the sari for 137 inches. I found that if I divided that by three (I'll tell you why later) and accounted for seam allowances, I would end up with a duster that was about 45 inches long--or just above the ankle on me. That seemed a decent length as I didn't really want a short one, but I also didn't want it dragging on the floor. (If you make one, you may want a different length.)

So here is how I cut what would become the back panel: I started by laying the fabric out flat on the floor. Then, I measured about 45.5".


I moved the tape measure in a few inches and cut from the edge to the 45.5" mark.


Then, I carefully moved the tape measure in a few more inches and cut to the 45.5" mark again.


I kept doing this. . .


. . .until the whole panel was cut through. (Incidentally, this is the best way to cut thin, chiffon-like fabric into a perfectly dimension-ed square or rectangle. This method assures that your whole piece of fabric is the same length all the way across. If you just lay a piece of chiffon down and cut straight from end-to-end, the fabric will shift and your line will go zig-zaggy and all over the place.)


Okay, so I set that piece above aside. Do you notice how much prettier the piece above is? That is what I was talking about when I said that one end of a sari is always prettier and more decorative: It's the part that gets thrown over the shoulder. Anyways, there is still some pattern that continues for several more feet, as you can see below. But notice something else: Do you see how the left-hand edge of the fabric has sequins whereas the right-hand side (where I'm pointing) does not? Okay, this is why I divided the embroidery measurement by three. I wanted to have sequins running down both sides of the two front panels as well. That meant that I would have to cut these thinner two panels from the left-hand side of the fabric you see below.

This will make more sense in a little bit.


Okay, so I found that the fabric was 42" across. I also measured the back of my neck and found that I needed about 4" for a neck space. That meant that the two front panels would need to be 19.5" across. (42 - 4 = 38. . .38/2 = 19. . .plus 1/2" of seam allowance = 19.5)

Again, I used my method of laying the tape measure on top of the fabric, and scooting it up as I cut to my 19.5" mark with each scoot. (The horizontal lines really helped me keep the tape measure straight, so look for patterns like that in the fabric to guide you.)


Okay, so then, I took my long strip of fabric and folded it in half. It was about 46.5" long. Perfect.


I held my hand on the fabric close to the fold to assure that I was cutting neatly down the fold.


Then, I laid the back piece down and the two front panels on top. Hopefully, now you can get the visual you need if you are wanting to do this yourself. You will first need to make sure that all pieces are hemmed at the bottom. (Remember how I hemmed the back panel?. . .Well, you can see in the picture below that the front pieces needed hemmed as well.) After that, only three seams: the sides (leaving room at the top for arm holes), the shoulders, and then the long inside opening seam (bottom up to the neck, and then back down to the bottom on the other side.) 


After hemming the bottom of the front panels, I stitched the side seams together. Okay. . .so. . .I did this a bit different from how you would normally do it. NORMALLY, you would pin the sides RIGHT sides together and sew. . .BUT! My fabric happened to have sequins along the edge of the RIGHT side of the fabric. Because I wanted to showcase these sequins, I pinned the fabric WRONG sides together. Does that make sense? I hope so.


Okay, before I started sewing, I chose a very large size 5 straight stitch. Why did I use such a big stitch for chiffon? Aren't you supposed to use tinier stitches for thinner fabrics???

Normally, yes. However, this duster thing is a trend. That means, it's probably going to go out of style by next year or the next. Also, there is a significant chance that I will personally hate this duster on me! I chose a big stitch so that I would more easily be able to take the stitches out if (and maybe when) I decide to refashion it into something else!


Okay, so here are my sides all ready to be stitched. Do you see the white pins on the right-hand side? Those were indicating to me where the arm holes were going to start, so I would sew from the white pins down to the bottom hem.


See the white pin behind the foot?


So, in this picture the duster is actually upside-down. Those slits at the bottom are actually the arm holes.


The next step was to sew the shoulder seams. See where my finger is? that is the bottom of one of  the arm holes. So, when you sew this seam, make sure to start from the edge of the arm hole and sew toward the neck. Both times. This will keep everything flush. (This time, I sewed with WRONG SIDES together.)


Shoulder seams typically need a little reinforcement, so I bound them with black lace.


Can you see both of the shoulder seams here? (Sorry that everything is black and hard to see!)


The last step was to finish the edge of the opening. You can do this a variety if ways. You could roll the edge if you have a rolling foot, or you could do like I did before to hem: Fold and stitch in place, then fold again and stitch in place. However, that last method takes up a lot of seam allowance, so I opted for binding lace again, but in a different way.

So, first what I did was to lay the lace on top of the RIGHT side of the fabric and stitch it along the edge.


Then, I folded it under like this: . .(1). . .


. . .(2). . .


. . .(3). . .


With it folded like this, I stitched it in place from the WRONG side of the fabric. This hid the raw edges, gave some stability to the the fabric, while at the same time not taking up a ton of fabric in seam allowance.


Here is the finished duster. I paired it with a black T-Shirt, black stretchy moto pants, and black moto booties.


The kids these days are all wearing these dusters more open like this. (If you wear it more closed, it tends to look a little matronly.) To do this, just kinda fold the front edges back and let it hang loosely open.


(If I can summon up enough courage, I will wear this to church tomorrow and then update this post with a picture of me wearing it!!!)


UPDATE: Well!. . .I did it!


The End!