Showing posts with label belt. Show all posts

Friday, August 11, 2017

How to Fix an Old Wide Black Patent Leather Belt When It Gets "Hairy"


If you're a fashionista, you've been here before.

You know that wide patent leather belt that you wear with everything? It never fails. After just a few times of wearing it, this happens:


It gets all hairy and looks very unsightly right in the center front where people's eyes tend to be drawn. So what do you do? Most of us probably throw them out and buy a new one. Well, if you just do this one simple step, you can keep your belt looking good as new for years to come.

(This also works if you find an old belt at the thrift store that someone else has thrown out.)


All you have to do is light a candle. Then, you hold the "hairy" parts close enough to the flame to melt them away. Be careful not to hold the belt too closely to the flame or you will melt the patent leather. Do this for all edges that have little threads sticking out.


Ta-da! Good as new!


The End!


Friday, December 2, 2016

Little Girl's Aprons - Two Ways (Regular Hem and Laced Edge)

This is a really easy project that you can do in a couple hours...Maybe just one if your internet doesn't suck as bad as mine! (I was trying to watch TV on my computer while I did this, and it kept messing up. So annoying! And we just got broadband!!!! Grrrr....I digress....)

My pastor's wife asked me to make two aprons for her granddaughter for Christmas. This was the fabric. I decided to make them two different ways. It is just a 1/2 yard of 44" wide cotton fabric for both.


First thing I did was to fold each piece in half and stack them on top of each other. Then I cut 4 inches off the top of both of them.


The 4 inches I cut off would become the straps. I folded up about 3/8 of an inch on either side of the straps and ironed them.


Then, I folded them in half and ironed them.


So then, I folded up 3/8 of an inch on the sides of the actual apron parts. (I'm just showing you one as the example here, but I did them the same so far.)


And then I folded that fold over again and ironed.


Okay, this was on the Paris one and not the cupcake one: I cut off the corner of the sides and bottom hem. . .


And I folded the bottom up once. . .


And again, and pinned it in place. I did this to both bottom corners of the Paris apron only.


Then, I pinned it from the right-side. (I always pin things on the right side, because I like to see it while I sew. It just tends to look nicer if you sew the side that will show.)


So, here is my Paris apron so far. It has all the sides and bottoms neatly hemmed.


Along the raw top edge, I did a 6-point basting stitch.


I used my basting to gather the skirt.


Then, I found the middle of the skirt and the middle of the sash and put pins there. (Incidentally, I made sure the pattern was top-side up on both the apron and skirt so it would look right when finished.)


Then, I pinned just the one edge of the sash to the top of the skirt--pinning out from the middle.


I sewed that down.


Then, I let the sash folds fall into place and pinned those--again from the right side. (This picture is showing the wrong side.)


This is the right side. I sewed it down.


The finished Paris apron (from the back).


Okay, so this is how I did the cupcake skirt. I folded the sides of the skirt part in twice and ironed, but I left the top and bottom edges raw.


I basted the top edge and then stitched it to the sash the same way as before. (Again, making sure the print was top-side up.)


Okay, so it kinda looks done, except the bottom edge is still raw.


A closer look at the bottom edge.


Enter: cotton eyelit trim. I stitched the right side of the lace to the right side of the fabric.


It's hard to tell here, but the eyelit trim is sticking out about 1/8" from the pink fabric. This is to make sure the "raw-ness" of the unfinished edge gets covered.


Other than the first pin, I didn't use pins for this because I wanted to make sure the trim and the fabric ended at the same time. (In other words: No ease to worry about.)


So here is it from the right side.


All I did was fold the trim back and iron it.


Here it is with the trim ironed back. I didn't need pins now either because it was laying the way it needed to. Now, all I had to do was stitch it down.


The right side. A finished edge.


The wrong side. Still a finished edge.


And from the inside of the waistbands, the edges are also finished.


The End!!!


Sunday, March 27, 2016

Refashioning: Jake the Pirate Costume from a Lady's Suit


I love my job, but sometimes it requires doing the most random things.

I am a secretary for my church. We had a Disney themed Easter egg hunt this past Saturday. My pastor's wife asked me to make a Jake and the Neverland Pirates vest for one of the teenagers to wear.

This is what Jake the Pirate looks like:


So, I was going to buy all the fabric needed, but as I was out driving, I thought I would stop into a thrift store just to see what they had. They had this lady's suit for $.50. It was just about the right size in the bodice, so I thought...why make a whole vest from scratch, when I could just work around something already made?


I went to Wal-Mart and got a few other supplies: yellow blanket binding, four yellow buttons, yellow thread, and iron-on facing...or what I thought was iron-on facing...


First step was to cut out the shoulder pads and cut off the sleeves.


It had patch pockets on the front that needed taking off as well. They were attached from the back to the front, so this is what I did to take care of this problem: 


This bottom hem would be covered in yellow binding, so it didn't matter that it was showing on the front.


Okay, next, I had to remove the collar because if you scroll back up to the Jake picture, you will see that it isn't right.


So, fortunately, since the skirt came with the blazer, I had enough fabric to make a new collar. I cut the elastic off the top of the skirt.


Okay, using the original collar as as sort of guide, I drew a new collar around it on paper I pieced together.


The first collar wasn't quite right. It sat too low. (Wow. I look very frazzled in this picture!)


So, through trial and error, I finally drew a collar pattern that I thought would work.


The main thing I wanted was for the collar to stand up a little bit in the back. The original pattern didn't do that.


Okay, so this is the part that really started to stress me out. I thought I had bought iron-on facing, because when I asked the lady at Wal-Mart, "Wear is your iron-on facing?" she lead me to the roll of the stuff I bought. . .which was actually iron-on adhesive! Grrrr. . .But I didn't have all this time to run back to Wal-Mart and get the right thing, because as I said before, I was at work. Meaning: I had other things I had to get done besides making vests! So, in the words of Tim Gunn, it was a "Make-It-Work moment.". . .


So I made two large pieces of double-sided fabric, essentially. It didn't have the body I wanted for the collar to stand up nicely, but at least it had a little stiffness--albeit heavy. I laid the double-sided fabric on top of each other and pinned my pattern to it and cut out the pieces.


Then, I stitched up the back seam of the collar pieces. 


Here is the middle back of the neck of the vest, denoted with a pin.


Then, I sewed the binding onto the vest, and very casually mitered the corners. (Again, not a lot of time to do it perfectly.)


Excuse my foot in this picture.


Then, I sewed the binding onto the collar.


Remember that pin in the middle back of the neck of the vest? I matched that to the middle seam of the collar, pinned them both together, and sewed them together.


Then, I tacked down the points of the bottom of the collar. (You can see the one on the left was tacked and the one on the right wasn't yet.)


I had left about 1/2" of sleeve so that I could use that as seam allowance. I folded that 1/2" under and sewed both sleeves up.


Last step: buttons!


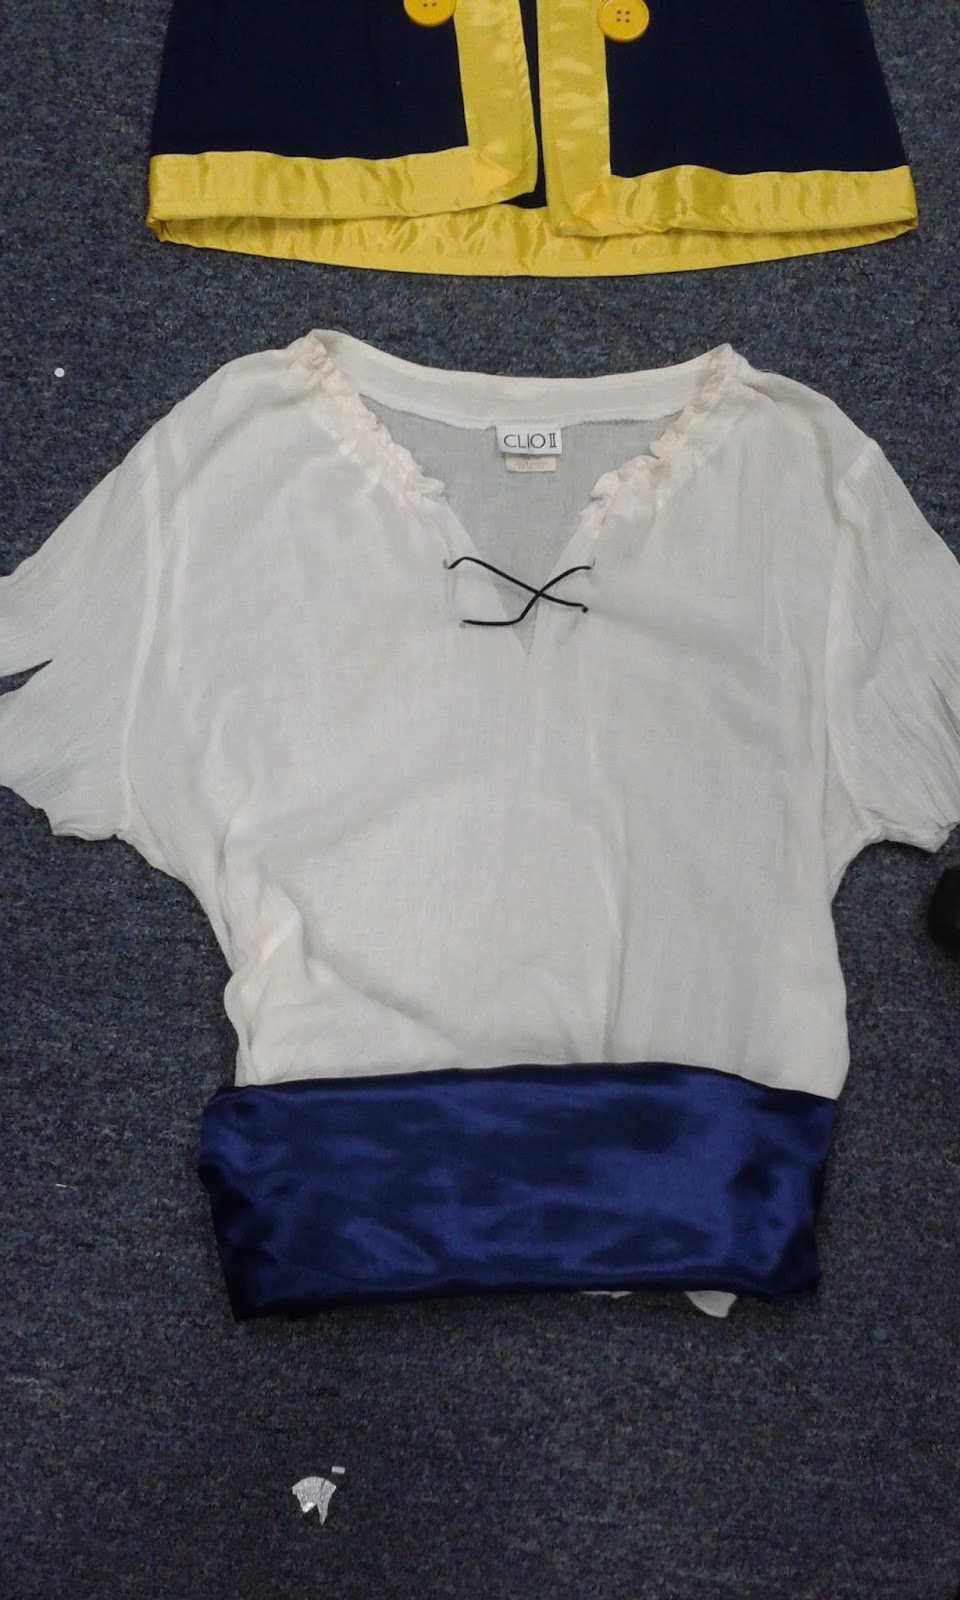
This was a peasant blouse that I reworked to make the Jake shirt. (Forgot to take pictures of this process.)


I made the headband and cummerbund out of some Wal-Mart poly-satin.


And here is what he looked like at the egg hunt! If I had had him in person to fit things on, I would have taken the vest in a bit, but anyways, he looks cute!


And here I am at the same egg hunt. I am supposed to be Cruella Deville, but the white hairspray I used turned out grey. Oh well! (That "fur stole" is a tube of faux fur that I made in about two minutes at the last possible second!)


The End!