Showing posts with label stitch. Show all posts

Tuesday, September 19, 2017

Tailoring: Simple Stripe Seam Match-Up

I covered this topic in a previous post, but anyways, here it is again!

I bought this green sweater at the thrift store. I love the colors, but it was a bit big across the bust. No problem. Usually, I try a shirt/sweater on, look in a mirror, and pinch around the excess to see how much I need to take something in. I did that for this sweater, however, I needed to do an extra step if I wanted the stripes to match up.


Okay, this really only works if the garment you are tailoring has stripes that ALREADY match up, or almost match up, at the seams. If the stripes are way off to begin with, trying to force them to match up will result in a bunched up mess.

Also, I know I usually tailor things around the armpit: the sleeve and the bust area. That's how I'm built. This may not be where you need to tailor. Maybe you have smaller hips and a larger bust. So for you, you would pin around the hip area. Same principle, just a different area. You can do this anywhere you need to.

So here is how you do it. First put a pin at the edge of the stripe from the top layer down into the bottom layer.


Now, lift up the seam and see if the pin is sticking through the edge of the stripe on the other side. This one magically was, so I didn't need to adjust anything.


Then, with the seam lifted, stick the pin back into the bottom layer and through to the top following the same stripe, like this.


Now flip the seam back down and. . .See?! A problem! See how the pin is coming up through the stripe instead of at the edge of the stripe? How to fix: Pick up JUST the top layer off the point of the pin. . .


And gently adjust it so that the pin is now sticking through at the edge of the stripe.


Here are a series of pins from the top. . .


And here are the same pins from the other side. They all match up perfectly from both sides.


Then, sew over the pins. Don't pull them out until you actually sew over each pin. Keep those stripes held in place until the last possible second!


Ta da! You can see a slight discrepancy near the armpit, but. . .who's gonna look that close? Only a very creepy weirdo with no life. 
Looks good enough in my book! You're done. Now, go work on your next project!


The End!


Monday, June 19, 2017

Refashioning: Moschino Inspired - Adding a Reverse Applique Graphic

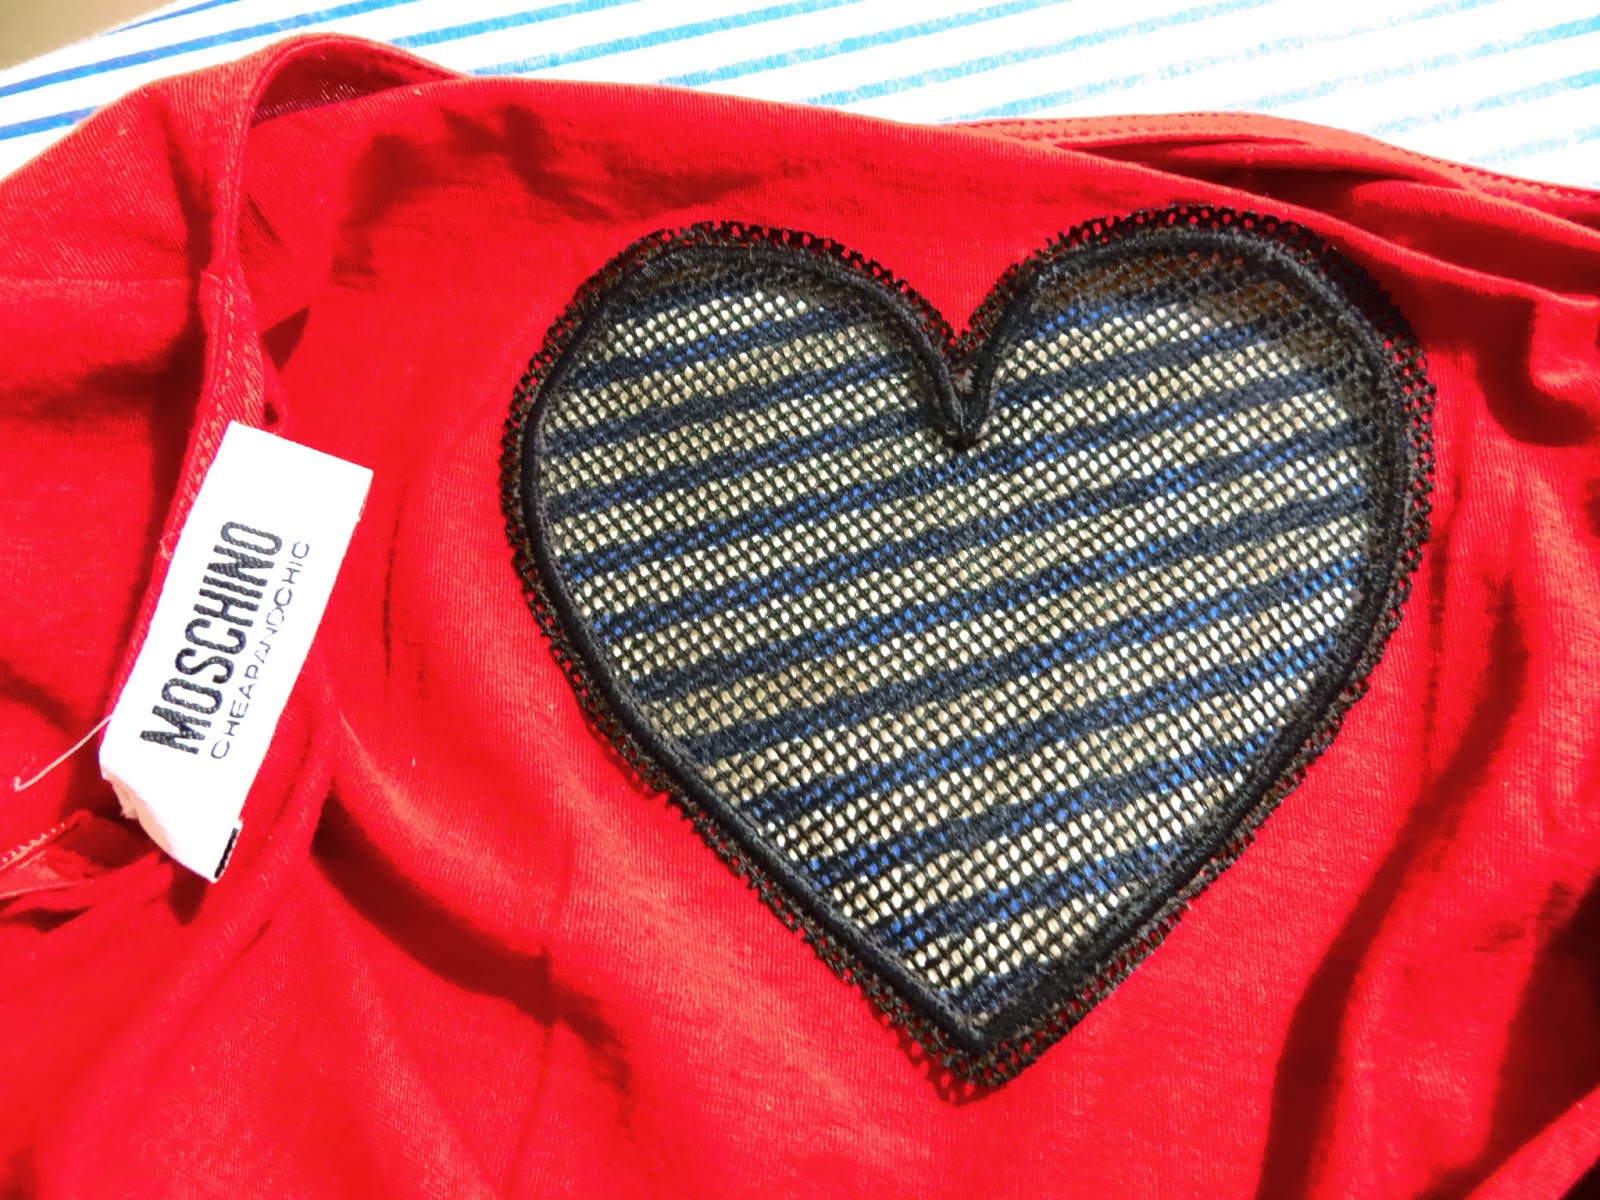
Continuing in the Moschino vein...here is a "Moschino Cheap and Chic" shirt that I bought last week.


It's interesting because the graphic heart is actually a stretchy mesh that was frame-embroidered into the shirt, and the shirt part was cut away to make a sort of "peekaboo" situation. That is why I'm calling this "reverse applique." Instead of adding a piece of fabric into an item, the designer subtracted a piece of fabric. Does that make sense?


Studying the back, I saw that the designer had placed the mesh BEHIND the shirt. You can tell this because you can see seam allowance around the heart from the inside of the shirt here:


Okay, so this post isn't going to be so much about a success story as it is a process of learning and trying something new. Hopefully, it will give you an idea or two.

I had this T-Shirt in my "Get Rid Of" pile, so I grabbed it to use for practice.


I wish I had black stretchy lace, but. . .I don't right now. I do have a bunch of this white stretchy lace, though, so I cut a piece to use.


I folded the shirt in half to find the center of the shirt and I drew a line down the center with tailor's chalk.


Then, I ironed some tear away stabilizer to the wrong side of the front of the shirt.


Then, I ironed some stabilizer onto the wrong side of my piece of lace.


This is how the pieces will be set up inside the shirt. The lace will be behind with the right side of the lace touching the back of the shirt. (In this picture, the shirt is inside out.)


Hard to see, but I drew a second line perpendicular to the center line to use as reference in keeping my embroidery hoop straight.


This part took forever. Hooping both the lace and the shirt and making sure everything was straight and even. . .no easy task!


This looks like I centered the shirt wrongly because the line is going slightly diagonally. Actually, the shirt is hooped almost perfectly. The line itself ended up being a little off.


Here is a peek at the back of the hoop inside the shirt. See how the lace is in the back?


I put the hoop into the machine.


This was my first time ever attempting a frame--let alone a reverse applique--so it seemed to me that I should stitch the first round using just a simple once-over straight line, and also making sure that the heart was 9.8cm across. When I would go back over it with a thicker satin stitch, I will have made the heart 10cm across. This was to make sure that the satin stitch would actually pick up both the shirt and the lace and not leave any gaps. (This will make more sense later.)


Okay, so here is my first round: the simple once-over straight stitch.


After that step, I pulled the hoop out of the machine and pulled the red T-Shirt away from its backing stabilizer. Using thread trimming scissors, I cut the heart portion out of the middle. I tried cutting up as closely to the stitch line as possible, but these scissors are not really made for trimming fabric, only thread. I do have some actual "duckbill" applique trimming scissors on order, but. . .I was too impatient to wait for them! (You will see later how I should have waited.)


Okay, so now I programmed my machine to sew a thicker satin stitch heart that was 10cm across.


See how the machine is stitching perfectly over the former straight line? That's why I did the first line at 9.8cm and the satin stitch at 10cm.


Okay, here's the problem: I should have cut a little more closely to the first stitch line because see how much red is sticking out from under the satin stitch? There are three ways to eliminate this:

(1) Use the same color thread as the shirt (in this case, red). That will make the excess red part less noticable.
(2) Set both stitch lines at the same centimeters across (in this case, 10cm). That way, the cut line will be farther into the satin stitch margins. I didn't know where my margins were when going from straight to satin--because I'd never done this before. I had tried to anticipate marginal error by doing the first stitch at 9.8. Next time, I'll try doing them both at 10cm and see what happens.
(3) Use actual trimming scissors. Trimming scissors are curved, which allows a person to cut much more closely to seams without the handle of the scissors getting in the way. "Duckbill" scissors are even better, because they lift the cut fabric out and away from the project so you can get even closer to seams.


Anyways. . .here is the shirt from the inside.


I tore away all the stabilizer.


And cut around the lace (just like was done to the Moschino shirt).


The finished shirt.


You can see my fingers behind the lace. So there you have it! A reverse applique!


Was it a total success? No. This was just a practice. But I learned a lot, so I thought I'd pass it on!


The End!


Wednesday, August 17, 2016

How to Fix Permanent Stains on a Garment

My sis took me to a new thrift store where everything in the store is $.25 on Wednesdays. I bought this neon yellow hoodie there. I almost didn't because if you look closely, there are permanent black ink stains on it, but then I was like, "You know what? For $.25, I can fix it!"


Here is a closeup of the problem. Because I couldn't take the stains out, I would have to cover them up.


I got some lace and threw it on top.


Then, I cut around the patterns in the lace so that it covered all the spots and pinned it down as I cut.


Then I zig-zag stitched all around the outside of the lace.


Then I sewed back and forth over top of the lace to make sure it didn't pull away from the shirt.


This is what the back of my stitching looks like (in case my explanations didn't make sense).


The finished shirt. To me, it looks really modern as "Athleisure" wear and mixing prints and textures are popular these days. I could also have embroidered something on it, but that would require taking the shirt apart so I could get it up under my embroidery machine. 
This was way easier. 


The End!


Tuesday, July 9, 2013

Fix Your Pants so They Lie Flat. . .In Five Minutes or Less

I have a problem when I go shopping for pants. Whenever I find skinny pants on super super sale (Read: the million $3.00 pairs of pants I bought at Rue 21 a few weeks ago), I have to buy them in several sizes larger than I am just so they fit on my hips. 

By the time I get to that point though. . .This happens:


Apparently, if your hips are big, your waist is supposed to be too. As a result of this clothing misfortune, I am constantly tugging my pants up, praying that they don't fall off! More expensive pants don't seem to have this problem, but. . .that fact is not going to make me spend more money!

Enter the solution:

Elastic. 

It doesn't have to be a particular size or type, just make sure it's a few inches long at least. I just used some elastic I found when cleaning out our "Hiking Closet." It is probably a crucial piece of elastic meant to save your life in some Bear Grylls way. Oh well. . .It's saving my life now, at least! (Don't tell my husband!)


Cut two slits in the inside part of the band around the waist. Make sure you cut the slits a few more inches apart than the length of your elastic.


You should be able to stick your finger into the slit. Notice the band around the waist is kind of a tube. Don't cut through to the outside of the band, or you will have a mess to fix.


Can you see how my finger is in the inside of the band, but the outside is not cut? Do that.


Stick a safety pin on one end of the elastic, and start feeding the pin through the band.


Once the elastic is almost completely through, secure the other end of it with a straight pin so that just a few millimeters of the elastic are sticking out the first slit.


When the safety pin makes it through to the other end, secure that end of the elastic with another straight pin. Can you see both slits with pins in them? It doesn't matter if your elastic gets all twisted up in there. It's probably not ever going to lie flat anyways, so don't sweat it.


Set your sewing machine on the widest zig zag you can get and sew forward and backward down the slit. Make sure the thread grabs not only the elastic, but also either side of the slit. If you don't get all three of these things, go over them again with the zig zag till you do, otherwise you risk a tear and/or losing your elastic into your pants (Read: Unnecessary Headache). It's okay if this stitching is messy. Skinny pants are meant for long shirts to be worn over them. 


Ta Da!


The. . .End. (Pun intended.)