Showing posts with label healthy. Show all posts

Tuesday, October 24, 2017

Make Your Own Turmeric Latte Mix!

If you haven't heard, turmeric lattes are the next big thing. They taste similar to chai lattes, but are super super good for you. The compound curcumin found within turmeric is widely known to fight cancer and inflammation and all kinds of bad stuff. I'm not a scientist nor a medical professional, and don't want to give mis-information, so. . .Google it!

Anyways, it can be kind of time consuming to make a real turmeric latte as it requires heating nut milk on the stove and using a hand-held blender to foam it.

When processes are that involved, let's be honest, we AREN'T going to do them every day.

So, here is a scaled-down easier method that you can do every morning in lieu of or in accordance with your morning coffee!


First of all, you will need at LEAST the following spices: turmeric, ginger, and cinnamon. All three of those spices can be found at Aldi or Big Lots for $1.00-2.00. (I suggest buying them soon as once big corporations find out that their low-cost items are now considered "health foods," they go and jack up the prices.)

I also added a tiny bit of cardamom, but that is because I have it. Be warned, though. Cardamom is like. . .upwards of $16 a bottle at Wal-Mart! It's really good for you, though, so if you have it, add it.


The ratio I have found on other blog posts and online recipes seems to be something like: 1 part turmeric to 1 (or less) part ginger to 1/3 part cinnamon. But if you like one of these spices more than the others, feel free to tweak. (You could also add pumpkin pie spices like nutmeg and clove if you want.) The important thing is to keep turmeric as the biggest part. I added a 3.75oz. bottle of turmeric, two 1.5oz. bottles of ginger, about 1oz. of cinnamon, and about a tablespoon of cardamom to this mason jar cup. (If you don't have a mason jar, an old washed out pasta sauce jar will work equally as well.)


Then, I shook it all together.


So now on to how to make the latte.

You can add as much of your powder to your nut milk (almond, coconut, etc.) as you want. I do a heaping tablespoon, and I add it to just a little bit of milk to start.


I stir that together for a few seconds. I do this because sometimes if you add the powder to a full glass of milk, it causes annoying lumps. If you stir a little milk with the powder to make a paste, the powder breaks down more evenly. (This trick is helpful with any powder-to-drink mix.)


Then, I filled the mug with milk. . .


. . .and added a little honey. I do highly recommend honey or some other sweetener as the spices can be kind of bitter/harsh on their own. But don't add very much! It doesn't take but a little bit of sweetener to counteract the bitterness. 
Don't cancel out the healthfulness with sugar! (You KNOW that is what the big corporations are going to do once these lattes catch on. They will create their own "ready made" mix and it will promise to be all healthy, meanwhile it will be LOADED with sugar. Happens every time!)

You can also add a tablespoon of coconut oil or ghee butter (if you real real fancy!) and heat it all together. That's what you are supposed to do, actually, but. . .anyways. . .I was running late this morning, so I didn't.


Then, I put the mug in the microwave for two to three minutes.

To make a really foamy latte, you can put this mixture in a separate microwave safe container, heat it for a minute, shake the container, heat it for another minute, shake it, etc., until you get a nice thick foam--you know, like a regular latte. Anyways, I didn't have time for that mess, so I just heated it up and sprinkled some cinnamon on top. My drink still had a little layer of foam on the top, so it wasn't like I was missing out on the latte experience or anything! 


So, there you have it! For a couple of dollars, you can have a ready made nice cozy spicy drink mix on hand for the whole winter (that ISN'T loaded with sugar)! You can also use the mix for other things besides lattes. You can add it to coffee, or like. . .muffin mixes. . .or wherever you feel appropriate.

(P.S. these jars make great gifts!. . .You're welcome!)


Simplified Directions:

Drink Mix:
1 part turmeric
1 (or less) part ginger
1/3 part cinnamon
(other spices - optional)
1 glass jar

Latte:
1 tablespoon of mix to a cup of nut milk
A bit of honey
1 tablespoon of coconut oil
Heat for 2-3 minutes
Enjoy!


One last note!!! Swallow a few peppercorns before drinking and your body will absorb the nutrients more fully! (Or you can add pepper to the mix, if you want.)


The End!


Friday, April 14, 2017

Make Your Own Healthy Pudding with Only Two Ingredients!

 Surprise! These are your two ingredients: Plain yogurt and protein powder. 

(You know how annoying protein powder is to mix with liquid? You either have to use a blender or buy several of those "shake cups" with the lids and a little mixer ball in them. Annoying to clean, you have to buy several to make the experience worth it--unless you want to commit to cleaning your cup/blender out every night--and just generally takes time that I don't feel like spending. Here is a better way to get your protein!)


First, put in the powder with its own scoop. (Important to do this first because protein powder likes to "poof" and get all over the place.)


Then, put in a few spoonfuls of plain yogurt.


It helps if you make sure that the yogurt completely covers the surface of the powder before you start to stir. (Cuts down on the "poof.") Stir for a few seconds and make sure to scrape around the bottom corners because powder likes to hide there. The fact that yogurt is more solid than, say, milk, helps the powder blend more thoroughly and quickly instead of clumping up and making a huge annoying and counterproductive mess.


Once it is mixed, you can eat it. It tastes exactly like regular pudding (depending on your brand of powder). You are getting protein, vitamins, and pro-biotics! Can your regular pudding do that? Methinks not.

Oh, and you can add fruit, if you want.


The End!


Friday, July 24, 2015

How I Lost Weight

By now, I'm sure you have heard the definition of insanity to be: Doing the same thing over and over, expecting different results. This is ever so true in life, but I find it especially true when it comes to weight loss. If you yourself are finding weight loss to be too much of a challenge, I hope you will try some of my ideas listed below. I am not a doctor nor a medical professional. I am just a person who used to weigh 160 (or more) pounds, and lost 35. These are just tricks that have worked for me. You may hate some of these ideas, but. . .if you've never done them and you are overweight, it's worth a shot, right?

1. You HAVE to change your mindset. - If you don't expect to lose weight, you aren't going to. Making excuses like, "I'm too old" or "I've always been a heavy" or "skinny people have it easy" or "it's genetics" are lies that are trying to hold you back. Yes, there are thyroid issues and genetic eventualities we all deal with--and some people's metabolisms are more efficient than others. The reality in general, however, is that most people eat too much but don't want to give up eating too much. If you are overweight, I'm asking you to see yourself in that last category. I know it's harsh of me, but I'm saying this from experience, and I want you to experience freedom. Lying to yourself with excuses takes all your power away. Being honest with yourself is the first step in weight loss freedom.


2. Weight doesn't come off quickly. - It took me about a year to lose all that weight, but I have maintained it for almost three years. Fad diets and pills are going to claim (and often give money-back guarantees) if you don't lose "X" amount within a week or two. The main problems with this sort of regimen are that (1) it doesn't help you maintain your goals because it is not a long-term plan; (2) long-term continuation of these plans robs the user of actual nutrition; (3) outrageous claims take all the power away from the user when it's the user who needs to take responsibility for his/her weight.

I would maybe use one of these programs to jump start your weight loss, but if you are committed to long-term health, you are going to have to change your mindset and eating habits forever.


3. You HAVE to change your eating habits. - It's scientific and observable that if you are eating a certain way and weight isn't coming off, you need to make more drastic changes. This is probably the hardest yet most beneficial thing to do--even more than exercise--simply because you HAVE to eat every day whether or not you exercise. If you are serious about weight loss, you will have to be less sedentary at some point, but you can start eating the right way right now before you figure out what exercise works for you! Once you start eating healthy, maintain that! Don't look at weight loss as something you do for a little while and then go back to old habits.


4. Invest in a bathroom scale. - Digital is better than analog. (Digital is more accurate, and it's too easy to mess with the calibration of an analog scale. Cheating ALWAYS happens. It's human nature.) Honestly, when I weighed 160 pounds, I had no idea I weighed that much and likely would never have gained all that if I'd had a bathroom scale to keep me accountable. Nowadays, I step on the scale every morning and use that information to plan my eating for the day. At first, stepping on a scale was really depressing (and sometimes after a vacation it still is), but I use the information to empower me, not destroy me. If I happen to be up 5 pounds, I know what my eating plan should be for the next week or two. If I've reached a plateau in my weight and I still need to lose more, I know that I need to make another drastic change. See your scale as your tool, not your enemy; and use it every day.


5. Get out of the mindset of "cheats" and rewarding yourself with food. - Stop rewarding yourself with food. Plain and simple. If you have achieved the next level of weight loss, the worst thing you could do is to repack yourself with calories. Consider this analogy: I had trouble with stabbing myself in the eye. One day, I went the entire day without stabbing myself in the eye. To reward myself, I stabbed myself in the eye.

See how lunatic that is? High calorie food is proven to be detrimental to weight loss and overall health, and yet we love it so much we use it specifically for celebration! Think about it. When do you eat the most? The holidays! When do you eat cake? Birthdays! Back in the olden days, cakes, ice cream, and candy were all reserved for once a year at the fair. Nowadays, most Americans have two or three tubs of ice cream in their freezers and feel they need dessert after EVERY meal. And we wonder why we are overweight!

If you achieve a goal in your personal weight loss, please consider rewarding yourself with something other than food. Don't allow this advice to start another vice, however! Taking yourself out for a shopping spree every time you meet a goal can be just as detrimental! Consider these options: Go for a nature walk, explore a new part of town, take a bubble bath, watch an episode of your favorite show, etc.. Americans need to relearn the art of denying oneself vs. gratifying oneself. We used to understand it years ago--back when we were skinnier.

A REALLY great and healthy way to reward yourself that I learned from my aunt-in-law who did Weight Watchers is to carry around the weight you lost for a few minutes. In other words, if you lost 5 pounds, find something that weighs 5 pounds and carry that around for a while. (A great place to do this is in the grocery store with flour or sugar bags.) Five pounds doesn't sound like a lot at first, but after a few minutes of carrying it around, you are going to notice how much it really is. Mentally congratulate yourself that you are no longer being weighed down by it!....But don't reward yourself with food!


6. Everyone's body is different. - This brings up the age-old frustration: Men lose weight faster than women. If you are a woman, like me, this information can easily turn into an excuse. Don't let it. Realize that your body is almost magical because it has the ability to grow another life (or even multiple lives) inside of it. Because of that amazing fact, your body holds onto fat longer. That layer of fat is also what gives you a beautiful, softer form. At some point, you need to embrace things about your body instead of hating them. Always remember that (1) girls in magazines are airbrushed and (2) everybody gets older eventually.

If you need competition to help you "stay in the game," refuse to compare yourself to a photoshopped ideal. Instead, compare yourself to yourself. If you are 50 pounds heavier than you used to be, look at pictures of yourself when you were thinner as motivation.

(Also, I encourage you to look into www.dressingyourtruth.com. It's uncanny how wearing the wrong colors can actually add pounds to your appearance. I don't make any money off this, so don't let that little thought stop you from looking into it.)


7. Don't eat fast food. - I have heard lots of people complain about weight loss, and yet they eat fast food. Remember that documentary "Super Size Me," about that guy who was in the peak of health who committed to eat McDonalds every day for every meal for a month? By the end of the month, his body literally started shutting down. Yeah. So. One of the main things I remember from watching it is that health care professionals now consider eating fast food once a week as "excessive." Consider that if you are overweight but eat fast food a few times a week. ONCE A WEEK IS EXCESSIVE. Let that sink in, and please stop doing it to yourself.


8. Portion control. - If you don't have a good handle on what portion control means, do this: eat half of what you normally eat. (This is especially good for people who I am never going to convince to eat vegetables.) If you aren't going to eat healthily, at least eat less. I really suggest limiting meats, pastas, sugar, and salt. When I personally eat those four things, I find it really hard to lose weight. Eating vegetables (especially raw ones) is not easy at first, but vegetables are really the only food that have any nutrients. I know there is protein in meat, but there is also protein in beans, nuts, quinoa, and flax seed--without the saturated fat.


9. Adding vegetables to your diet, doesn't erase a bad diet. - I know lots of people who think that vegetables are there to counteract the bad stuff. This mindset will keep you fat. Just because you ate a bag of carrots after you ate a hamburger isn't going to magic the hamburger away. Replace the hamburger with the carrots, or at least eat half the hamburger and half the carrots. If you see a diet as "both and" instead of "either or," you are going to have trouble.


10. Stop grazing. - I know just about every health magazine promotes this idea that you can eat continuously all day and somehow lose weight, and honestly you can...if you do it right. The problem is that most people do it wrongly. When a person hears, "You get to eat all day long!" they inevitably end up including bad stuff or large portions and then throw some apples in there so they can feel good about themselves. If you graze--and if you are serious about losing weight--only eat small portions of healthy food. In a few weeks, when you HAVEN'T lost any weight, consider not grazing.


11. Consider skipping a meal. - I know this goes against everything you've heard, but it works for me. It has also worked for other people I know. We have all been told that breakfast is the most important meal of the day. If you are not losing weight, try scrapping that advice. Instead, drink water all morning until your first bowel movement. (I know, it's gross to talk about. Sorry.) Once that is done, continue seeing how long you can go before eating breakfast. (When I leave for work in the morning, I pack my breakfast in my lunch bag to eat later vs. eating while running out the door.) Sometimes, I skip breakfast entirely. Sometimes lunch. Sometimes my lunch ends up being my dinner. If you live in America and you are rich enough to read this on the internet, you really don't have to eat as much as you think.


12. Exercise. - This is really hard for most people, because most people think they are too busy. If you have an hour to "crash" on the couch after work and watch T.V., you have plenty of time to exercise. Consider multi-tasking. Why not exercise while you watch T.V.? I blogged about a T.V. exercise plan here if you want some ideas. If you take care of children, why not get them to be active along with you? They will sleep better. (Entice, entice...)

I say "an hour" because if you are really serious about losing weight, it's gonna take an hour of sweating. I know there are all these "20 minute" workouts out there, and yes, 20 minutes is way better than none at all. But I say again, if you are SERIOUS about weight loss, it's gonna take an hour at least 3-5 times a week.


13. If you are female, it is likely you won't lose any weight for a month or so. - Personally, it took me about three months before any of my weight would budge. Again, it has to do with the fact that women's bodies don't give up fat easily. It's okay, though. Stick with it and it will happen. Be kind to yourself and don't cheat.


14. Green smoothies. - Whether you skip a meal or not, you really need to replace one of your meals with a green smoothie. First of all, all vegetables have nutrients, but most of us never unlock those nutrients because they are enclosed within the cell walls of the plant. Chewing releases barely any of these nutrients and so most vegetation simply passes through our bodies as roughage. A blender or juicer breaks these cell walls and releases essential vitamins, minerals, and enzymes.

I was surprised when I started replacing my dinners each day with a smoothie. I thought they wouldn't ever satisfy me and I would be hungry after. Amazingly, I find them hard to finish most of the time.

I know lots of people think they hate vegetables. If this is the case for you, consider that maybe you need to open the possibility that there are vegetables out there that you do like. (For me, I can never get enough avocado.) From there, start adding more and more variations. I say variations, because if you get stuck in the rut of just doing kale, avocado, and lime juice, say, your body isn't getting all the nutrients it needs from other vegetables. Be willing to explore the produce section. If money is an issue, only buy what is on sale that week.

You can be creative with your smoothies, but remember vegetables are better than fruits in this situation, because they have way more vitamins, minerals, and enzymes and fruits are packed with sugar. (Yes, it's good sugar, but to a diabetic for instance, it's still sugar.) A quick Google search will uncover thousands of green smoothie recipes, if you need ideas. Always remember to add some nuts or soaked beans for protein, though.


15. Regrow your good bacteria. - If you are coming from a diet of carbs and fats and switch "cold turkey" to vegetables, your stomach and intestines are going to hurt, then you are going to think this is just a load of crap, and you are going to go back to your bad diet. This is mostly owing to the fact that bad food has killed the good bacteria and fed the bad in your stomach. You will need to get some probiotics into your system to regrow this good bacteria. You can spend lots of money on the pill forms of probiotics, or you could just do what I do: a dollop of plain unsweetened yogurt on my frozen fruit-laden oatmeal in the morning and a spoonful of either sauerkraut, red cabbage, or kimchi in my green smoothie at night. (A great side effect of regrowing and feeding the good bacteria is that your body will eventually stop craving bad food so much.)


16. Organic potato chips...are still potato chips. - A lovely change that farmers have started making is the switch to organic farming. It's true that pesticides and hormones cause health problems in consumers. However, it is also really easy to lie to yourself and buy high calorie food simply because the label reads, "organic." Here is a great rule of thumb: Organic is great, but if it's in a box or bag. . .it's not that great. If you eat organic all the time, but aren't losing weight, consider changing your mindset here.


17. You are going to reach plateaus. - As I've said, I've lost 35 pounds over the course of a year. It didn't all happen at once. Again as I've said, I didn't lose anything for the first three months. After that, I lost five pounds right away. Then I lost another ten and my body stopped losing weight for awhile. I had reached a plateau. It was depressing because I was still 145 and I wanted to be 120 (which I'm still not, but that's okay). At that point, I had to take account of what methods I was using and then be willing to change them even more. I lost another 10. Plateau. Change. Lost another 5. Plateau. At this point, I'd lost 30 pounds, weighing 130. Those last five were by far the hardest to lose, and I still wish I could lose five more past that, but the grass is always greener, right? I am happy that I was able to lose 35 pounds, and I will work to maintain it. (Honestly, I could probably lose another five if I really really worked at it, but I enjoy food as much as the next guy, and I find a life of total deprivation to be not a happy one.)


18. Cut back on caffeine. - I know there are studies that show that drinking caffeine in the morning can help you lose weight or whatever. Maybe in certain ways it can, but once I personally cut back on caffeine, I saw a big difference in my weight loss. I used to drink two or three cups of coffee every morning. Then my husband and I decided to do the "Daniel Fast" one time (21 days of eating only fruits and vegetables and drinking only water). That first week I had major headaches, nausea, and just depressing feelings like my best friend had died or something. After that first week, I felt more energetic than I had in years. (I know it was cutting the caffeine that did it because Billy and I were already eating mostly fruits and vegetables up to that point.) Listen, I still have a cup of coffee now and again--especially on vacation at restaurants--but at home and whenever it's possible, I drink decaf or none at all. I know decaf still has trace amounts of caffeine and doesn't taste as amazing as regular, but it works for me. I never want to go back to caffeine dependence.

Another reason I suggest cutting back on caffeine for weight loss is because it does "jump start" you. That sounds contradictory, but hear me out. Drinking it in the morning is almost acceptable (even though you still develop and addiction), because it "wears off" during the day. However, especially if you enjoy drinking it in the afternoon, it is going to directly effect how you sleep. Maybe you don't notice it and fall right to sleep even if you drink it an hour before bed, but studies show your body doesn't sleep well if there is caffeine running through your veins. Sleeping well is a crucial part of weight loss. If your body isn't totally asleep, it can't run through necessary repair/immunity functions. If it doesn't do these functions well, you will develop chronic problems over time--weight loss being the least of these.

P.S. You know if you stop drinking soda (even diet), you will lose like 10-15 pounds right away, don't you? Okay. Just making sure you knew that.


19. As you age, you will need to try new methods. - It can be depressing to think, "Gosh, why can't I just eat the way I used to when I was 25?" Don't think like that. Your body is going to keep changing and metabolizing differently. Honestly, this is why that bathroom scale can be your best investment. Stay on top of your weight, and be willing to make sacrifices if you need to. You can actually prolong a youthful metabolism and reverse age-related diseases if you feed it a majority of raw fruit and vegetables with beans and nuts for protein.


20. Honestly answer the question: Which do I love more? Eating or Exercise? - The answer to this question is very indicative of who weighs more and who doesn't. If you can't give up eating, and you refuse to exercise, you need to start finding things to love about being fat and embrace them. There is nothing more frustrating than a person who complains that they are fat, but can't pass a candy dish without taking one or two.

If you dare, do this little practice to strengthen your will-power: Buy a bag of your favorite chocolates and put them in a highly accessible place in your house. Open it but don't take any. Whenever you pass the bag and you feel a craving, go to the refrigerator and eat a baby carrot or grape. Keep the bag accessible and open. When you have people over, let them take whatever they want. Observe them. Observe yourself when they take them. Are you angry? Are you jealous? Are you sad? If you are, candy has become your master. Congratulate yourself every day when you don't give into the candy, and keep losing weight! You really can do it.

You really really can.


The End


Thursday, January 8, 2015

Homemade Chemical-free Toothpaste

So my mom bought me a "make your own natural toothpaste" kit for Christmas. I put it all together tonight. I'm guessing at the measurements because they were all pre-measured in the kit, but these are the ingredients I used. The last three I added.

1/2c bentonite clay
3 cinnamon sticks (about 2.5"ea.)
1T dried stevia leaf
2T whole cloves
1t Celtic sea salt
2t baking soda

(2 packets xylitol sweetener, 3T activated charcoal powder, and one whole nutmeg)

I simmered the cinnamon, cloves, stevia, and nutmeg in 1 1/2c of water in a saucepan for 30 minutes. Then I strained them into a glass and added the salt, baking powder, and xylitol. I added the charcoal to the clay and then mixed in the liquid till I got a paste.

I currently store it in a glass container in a drawer (away from light) and add it to my toothbrush with a wooden chopstick so as to be sanitary.

Apparently, the clay is super absorbent and shouldn't be stored in plastic or metal as it can absorb the chemicals and heavy metals. I'm a little worried because my toothbrush bristles are plastic...but I figure that at least it's better than using fluoride toothpaste...? Maybe? Hopefully? Am I gonna die?.....Moving on....

According to the instructions that came with my kit, cinnamon and cloves are anti-bacterial (so is nutmeg, which is why I added it). Stevia is a natural and non-cavity forming sweetener (so is xylitol, which is why I added it too...plus, it's supposed to strengthen enamel from what I've read). The clay absorbs bacteria and scrubs gunk off your teeth (so does charcoal, plus it's supposed to whiten somehow...even though it's black...?).

I know I sound confused in this post, but I'm actually really excited to use it because my gums have been receding for the past 20 or so years and maybe this will help. I've used it a couple of times so far and it feels and tastes pretty good.

I'll have to post an update at some point. Will this toothpaste solve all my paranoid health concerns or will it aid and abet my teeth rotting out of my head? Stay tuned for the answer!

The End!

Thursday, November 20, 2014

Pumpkin Pie that WON'T Kill You...in 20 minutes!

We all know that a high mortality rate from over-indulgence is a uniquely Western problem. (Wow. Turning 35 has made me really preachy...) Anyways, here is how to make a pumpkin pie that not only tastes good, but helps grow and maintain healthy stomach flora with good bacteria.

I know some people hate chatty blogs, so I've bolded what you really need to know.

CRUST

Ingredients: 1/2 apple sauce, 1/2 cup ground flaxseed, 1/2 rolled oats, 1/2 chopped nuts, 2T sunflower oil, 2T coconut flakes. (If you hate coconut, don't add the flakes.)

Directions: Preheat the oven to 350. Mix all the ingredients together. (I do my mixing in the pie pan itself to save washing an extra bowl.) Spread the mixture throughout the pan. Bake for 12 minutes.


As you can see from the picture above, I added my coconut flakes on top of everything else.


PIE FILLING

Ingredients: 1 can of pure pumpkin, 1t cinnamon, 1/2t nutmeg, 1/2t ginger, 1/2t allspice, 1/2t cardamom, 1c vanilla yogurt, 2T gelatin dissolved in 2T of hot water. 

Directions: While your crust is baking, mix everything but the gelatin together. (I do my mixing in the yogurt tub itself so I don't have to wash another bowl.) Dissolve the gelatin separately in between stirs of your filling mixture. Once the gelatin has cooled a little, add it to the rest of the filling. (You don't want it too hot, or it will kill the good bacteria in the yogurt.) Put the filling in the refrigerator for a few minutes until your crust has finished baking and has cooled. 

P.S. I don't add sugar because there is plenty in the vanilla yogurt. If you are a sugar fiend, then...*sigh*...I guess add some. Just remember, the point of this exercise is to make something healthy.

While you are waiting for all the cooling to finish, let me explain why I'm using gelatin. I realize that gelatin is an animal product (well, so is the yogurt if we want to get technical), but I needed something that was a good thickening agent and I didn't want to add eggs because I'm not cooking the filling. If you don't want to add gelatin, then use a vegetable thickener or just freeze the thing and eat it like an ice cream pie. I don't freeze mine because, again, don't want to hurt the good bacteria in the yogurt.

Also, if eating uncooked pumpkin out of a can makes you nervous, then I guess you can buy yourself a pumpkin and puree it the old fashioned way. I'm just using what I have on-hand because I'm too lazy to leave the house.

Here is the baked crust. It actually holds together quite well.


Once the crust has cooled down from hot to slightly warm, go ahead and add the filling. It may have congealed into lumps in the few minutes that you've been waiting, so just run it through a blender before you pour and you'll be fine. Once you've poured it, spread it throughout the crust. Put promptly into the refrigerator. 

(It may or may not set depending on how much gelatin you use or your altitude or if the baking gods are smiling, so if it doesn't, go ahead and put it in the freezer and serve it like an ice cream pie.)


The End!


Friday, October 4, 2013

Wholegrain (Wheat-free) Apple Crisp

Apples are stinkin' cheap this time of year (1 - 9 apple bag is $1.98 at Aldi!), so I'm currently making apple chips with 5 Granny Smith apples (How to make apple chips: Buy a dehydrator. Slice apples and put them in. Wait.). However, I had all these extra ends of apple. (You know how after you've cored them and you've sliced them, it gets to a point that you can't slice the end anymore without cutting your hand to pieces?. . .That's where these ends came from.) So, I decided to cut up three more apples and add the ends and make some apple crisp. I didn't know how, so I looked up a recipe, but. . .you know me and recipes! Here's my healthier option:


You will need: 

1. 4 or 5 apples
2. A handful of nuts (any kind...or not...)
3. A few tablespoons of flaxseed. I eyeballed...If you need exact, then do 3T.
4. No more than 1/4c of brown sugar. Maybe less, actually.
5. A dollop of Lite Maple Syrup or honey
6. A splash of lemon juice

Mix 2-6 up; then add the apples and mix them into the mixture. Put this mixture in an oven safe casserole dish. Preheat your oven to 350 and mix the following for the topping:

1. 1/4c (or an eyeballed pile) of flaxseed
2. 1/2c (or another eyeballed pile) of oatmeal 
3. 1/8c of brown sugar (or not)
4. A few shakes of cinnamon
5. A few shakes of cardamom (or not)
6. A shake or two of nutmeg
7. A handful of nuts (or not)
8. A splash of apple cider or a couple spoonfuls of apple sauce.

Mix 1-7 up and then add a splash of apple cider--just enough that the mixture balls and crumbles. I also pour a little apple cider over the mixture in the casserole dish before I add this topping to it (helps the apples get good and juicy).

Feel free to play around with ingredients. You don't have to be too exact, because you're not making a cake or nuthin'!

Bake for 35-40 minutes. Turn off the oven and let it stay in there for a few minutes before you take it out.

Fun Fact: My husband calls the country-fried chicken breast with a fried egg on it at Cracker Barrel "Chicken Porn." Since I use apples, apple sauce, and apple cider for this recipe, I call this "Apple Porn," but I figured that it wouldn't be appreciated if I put "Porn" in the title of my recipe, so. . .there. Now you know.


The End!


Sunday, June 30, 2013

Make Your Own Blush

Making blush is as easy as making your own face powder. You start with any organic red powder and add cornstarch till it matches the blush of your skin. (I also added pearl powder by smashing up a pearl and putting it in!)


If you are more olive-toned (look best in off-white), add cinnamon, red tea powder, or powder that is cinnamon-colored.

If you are more blueish-toned (look best in white), add berry or beet powder or powder that is blueish pink.

Of course, you can mix blue tones with yellow tones if your tones are mixed.


Only make a little at a time and wash your brushes frequently as there are no preservatives in this recipe. Don't be scared by this advice! At least you are not putting harsh chemicals on your face! Some blogs say to add baking powder to help save it, but other blogs said the baking powder was too harsh on skin. I made the little travel-sized pot above with just cornstarch and beet juice powder, and it lasted me over a month without any problems.


For a complete list of makeup DIY, go here.


Friday, May 24, 2013

Diet Apocalypse Soup


So, if you're like me, you are constantly hungry. One way I stave off hunger, maintain my weight, and save money is to make bean soup. It's super high in flavor, fiber, vitamins, and protein but low in sodium and fat. It's a recipe handed down to me for years and years from mine own head. It's a bit labor-intensive (takes about 3 or 4 hours), but you can do other things while it's cooking.  Also, it makes you feel like an olden-timey kitchen maid or a witch from Macbeth.

I know it's an odd time of year for such a hearty meal, but you can eat it cold if the weather is too hot. Leastwise, you will eat off it for days and days...maybe weeks or months: Hence the apocalypse reference. Here's how I do it:

Get these staples:

1. A huge stock pot. (Remember when you made laundry soap? Use that one.)
2. A ladle.
3. An iron skillet.
4. A wooden spatula

These main ingredients:

5. Four or five bags of dry beans (It doesn't matter what kind. Pick your favorites! I usually buy one of those 15-bean bags and add three or four bags of whatever bean is cheapest at the store. I like lentils and split peas. Don't buy canned beans because that's gross.)
6. Some chopped up meat (Not much. Let's say 1/2lb. I use either the lowest fat/sodium sausage I can find or else ground turkey. Meat is kinda optional. I only add it to keep my husband happy happy happy.)
7. Mustard (I like honey, dijon, or spicy, but regular is fine too.)
8. Garlic and onions (I usually use about 3/4c of minced garlic, and two onions.)
9. 1-2 cans of diced tomatoes (Or use 3 or 4 fresh ones for even lower sodium.)
10. 3 peeled potatoes (You won't be eating these.)
11. Chili powder (Or dried red peppers.)


Then choose whatever you like from the following:

Carrots, Celery, Sweet Potatoes, Spinach, Peppers,.....any vegetable (or spice) you want. You can add as much as you want as long as it all fits into the pot. Apples are a great addition because they add fiber and texture. You can also throw in any compatible left overs like chili or spaghetti sauce that haven't gone bad yet, but that you probably aren't going to eat otherwise.


Directions:

1. Empty all your beans into the pot. Cover them with water, swish your hand around in them, and dump out the excess water. You can repeat this several times. Then cover them with several inches of water and stick your pot into the fridge overnight.

2. The next day, swish your hand in the beans again and drain the water. You can wash them again a few times if you want, but eventually pour some warm water over them till there is about an inch of water above them. Put the pot (covered) on the stove on medium high heat, and bring to a gentle boil. You may have to stir a few times. Don't put it on high heat, because you risk scorching the soup. (This is experience talking!)

3. While that is happening, peel three potatoes and toss them in. This is to "de-gas" your beans. If you have a stomach of iron, I suppose you can skip this part, but don't ask me to sit next to you.

4. Once a boil is achieved, turn the heat down low. Like really low. Like almost off. Trust me on this one. Even one degree too high can scorch you a nice black layer of evilness on the bottom of your pot. Not everyone has as nice a husband as I do who is willing to scrub that off! You will let this simmer for three hours, stirring every 15-30 minutes.

5. Do another activity for two and a half hours that won't take you too far from your pot. Nap, workout, TV, read, sew, clean, pick your nose, etc.

6. During the last 30 minutes of cooking time, saute some garlic and chopped onion in your iron skillet. Then, add some meat. You can either microwave your meat ahead of time and drain the fat, or you can just use something low fat like turkey and brown it in your skillet. The little bit of fat in the meat will add some lubrication to the skillet. (You can add more vegetables here if you want. Sauted vegetables/fruit taste better than boiled.)

7. Once the three hours are up, remove and toss the potatoes (Don't eat them! They are full of gassy nastiness!). Then, add the tomatoes into the pot along with the contents of your skillet (and leftovers if you want).

8. Add some mustard and some chili pepper. Go easy on the pepper and careless with the mustard. Mustard is the secret to a super great bean soup, as far as I'm concerned. Also, the longer chili pepper boils, the hotter it gets.

9. Simmer all these ingredients for another 30 minutes doing several taste tests along the way to check if you need more mustard.

All done! All you need now is some black pepper and a light sprinkling of your favorite cheese on top. Cornbread is a nice addition to such a meal. Don't be afraid to experiment with different ingredients each time.

It's fun, healthful, and keeps you full so you don't need a midnight snack. Also, if you go easy on the meat and cheese, it will clean you out like a nice yummy scrub brush.

This soup will feed approximately a million people and costs between $15 and $20 to make. Actually it makes about 30 servings, but if you add a little more water it will go even farther.

Since I live with just my husband, I end up freezing about 3/4 of it in plastic containers or freezer bags and pull one out every once in while when I don't have time to make dinner. It's so much better for you than a frozen entree at the grocery store and just as fast to reheat and serve.


If war breaks out, you're ready!

Tuesday, April 23, 2013

Make Your Own SPF Lip Balm

This is continued from Make Your Own Stretch Mark Eraser, if you want to make that. To make the eraser, lip balm, and eye cream, it took me about 20 minutes. That's why I'm writing these three blogs in a sequence. Otherwise, to bring you up to speed, you need these ingredients:


Namely:
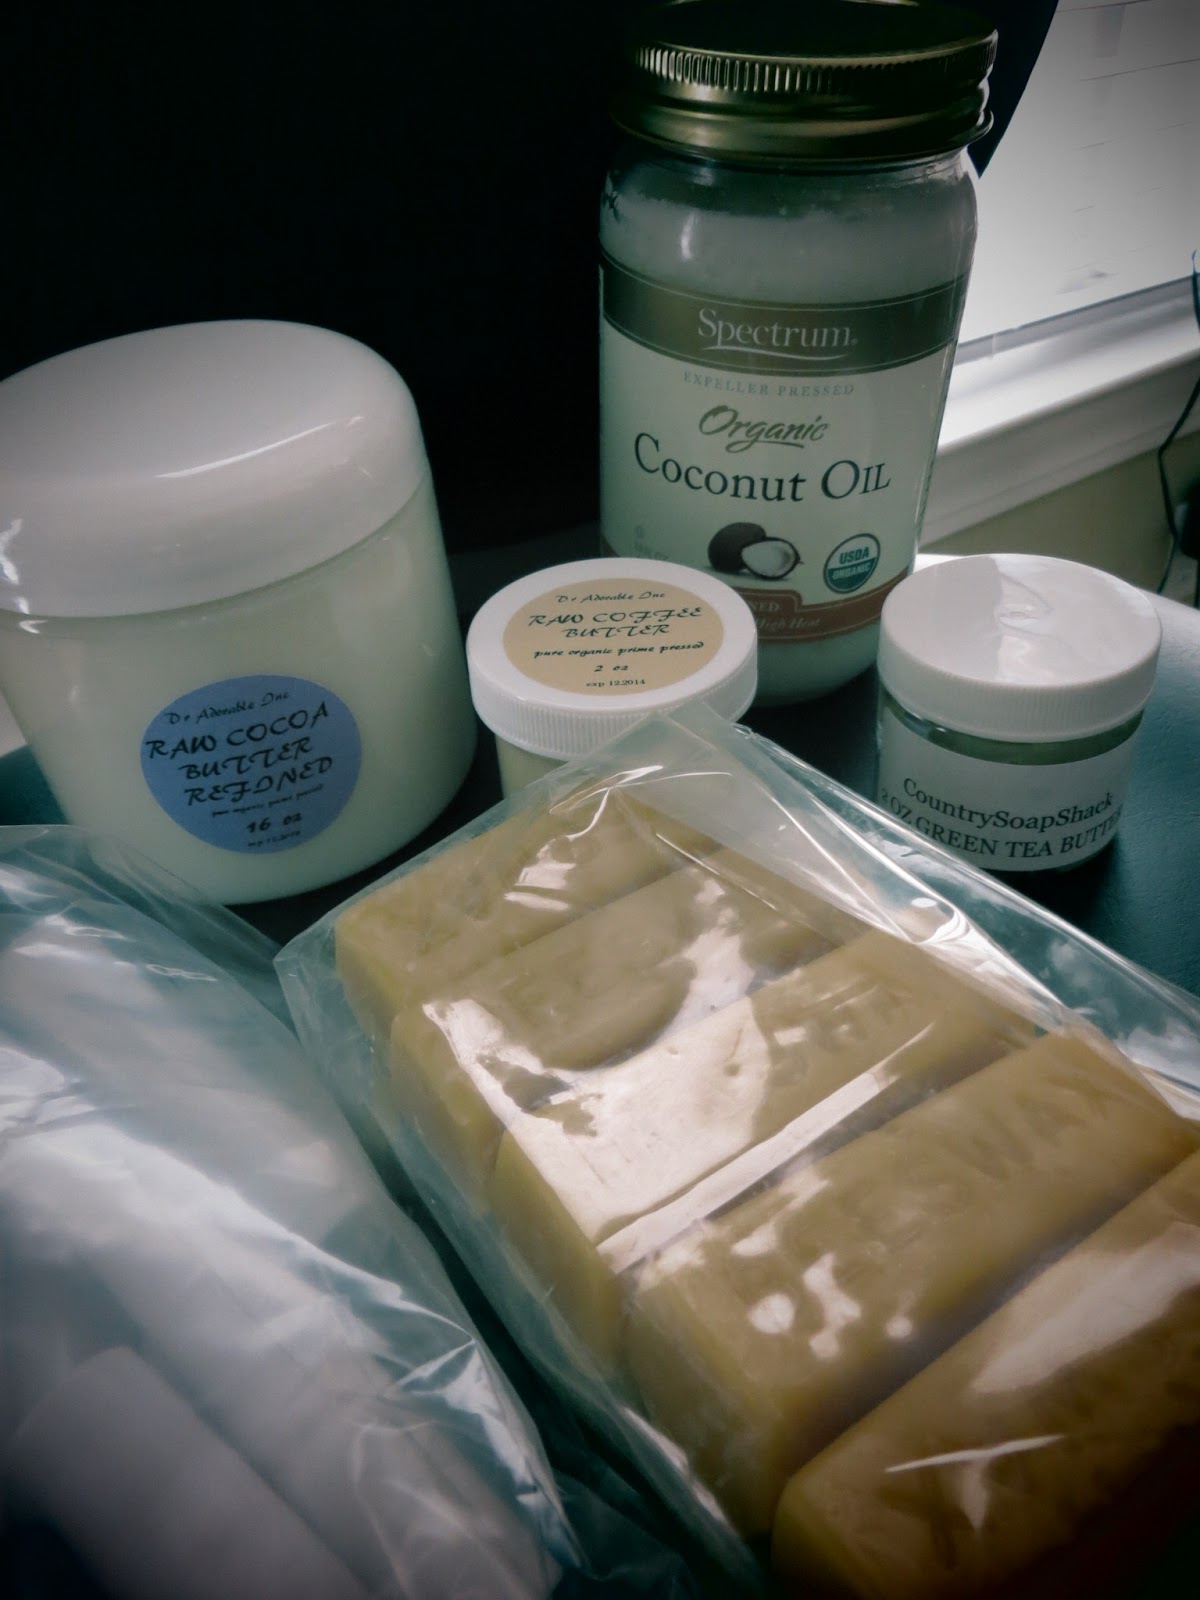
1. Cocoa Butter 
2. Coconut Oil
3. Coffee Bean Butter
4. Green Tea Butter
5. Beeswax
6. At least 4 lip balm containers (You used 2 of your 6 for the stretch mark eraser)

All these ingredients can be found raw and for sale on eBay and Amazon. You don't really need the Green Tea or the Coffee Bean butters, but I added them because they are really good for protecting against sun damage. However, coconut oil has some sun blocking capabilities on its own. If you want major sun blocking power, add some zinc oxide powder (cosmetic grade) before the last step.


How to Make Lip Balm:

If you've already made the eraser, skip to the third picture down. Otherwise, get a hot pot and put water in it and wait for it to boil (or else put a pot of water on the stove):


While the water is boiling, grate about a tablespoon and a half of beeswax. (It's really annoyingly sticky and doesn't wash off your grater very easily, but grating it helps the beeswax melt more evenly later. It's actually an important step not to skip.):


Now add your beeswax to a Pyrex measuring cup and submerge it into the boiling water. (Don't use a plastic cup.):


Wait for it to melt then add one tablespoon of coconut oil and one table spoon of cocoa butter. Mix it all with a chopstick or butter knife. (Notice the towel under my hot pot now in this picture...):


Then add about 1/2 a tablespoon of green tea butter and coffee bean butter:


Then add some fragrance or flavoring. I added peppermint extract to make it all "Burt's Bees"-y. Also, I knew peppermint wouldn't conflict with the eye cream I was going to make after this:


Pour your liquid into four lip balm containers. Put your containers in the fridge in your Pyrex cup. (The starred containers below are my "erasers" from the blog prior to this one.) I got the idea to stand them up with paper towel from another blog:


The finished product:


Things to remember:

1. About 1/2 a tablespoon of butter will fill a lip balm container, so for 4 containers, you need 2 tablespoons total of product. If you do the math on the directions I just gave, you will come to 4 1/2 tablespoons of product (1 1/2T beeswax + 1T coconut oil + 1T cocoa butter + 1/2T green tea butter + 1/2T coffee bean butter = 4 1/2T). I used the remaining 2 1/2T to make my eye cream in the next blog.
2. Any seed/bean butter will work in place of these, I just used these ones for their sun damage fighting properties.
3. My husband loves this lip balm. He claims it lasts longer than his other lip balms. . .and he's right!


Now to make eye cream...


For a complete list of makeup DIY, go here.

Monday, April 8, 2013

Make Your Own Leave-In Conditioner

Why this is a good idea:

1. Easy - This is a very easy item to make. In fact, all you need to do is buy a jar of Coconut Oil. (You can actually stop reading here if you just wanted to know how to make it.)

2. Versatile - Coconut oil is kind of a splurge (Mine was $7.50 for 14oz at Food Lion), but a little goes a looooooong way, and this same jar also can be used for cooking. (Word to the wise: Coconut oil is one of the only plant-based oils that is super high in saturated [i.e. bad] fat. It is slightly better for your bad cholesterol levels than cooking with butter, but if you are looking to lose weight, cook with an oil that is liquid at room temperature [i.e. canola or olive].) Also, if you stay tuned, you will learn other interesting and fun money-saver/natural things you can make with coconut oil--so make the splurge!

3. Better - I have tried every hair product on the market and nothing ever works. What I notice about coconut oil is that, used sparingly, my hair is more manageable, softer (emphasis on the soft!), and way less "fly-away" than it's ever been. Plus, coconut oil is natural, so you know it's better! You too can have the hair of an island princess!

4. Frugal - Even though a jar is $7.49, you will use far less of it than any other leave-in treatment you can buy. Also, you will save water because coconut oil is antibacterial, so you won't have to wash your hair as much. Furthermore, you will be saving yourself the application of sulfates and alcohol (which promote hair loss) and other nasty filler chemicals that "the man" adds to your current hair products.


Something I like about coconut oil is that I didn't have to special order it or go to some health food store to get it. There is a certain comfort in knowing I can always go to the grocery store if I run out. (Any Mitch Hedberg fans out there?. . ."Oh yeah! . . . Kinkos!")


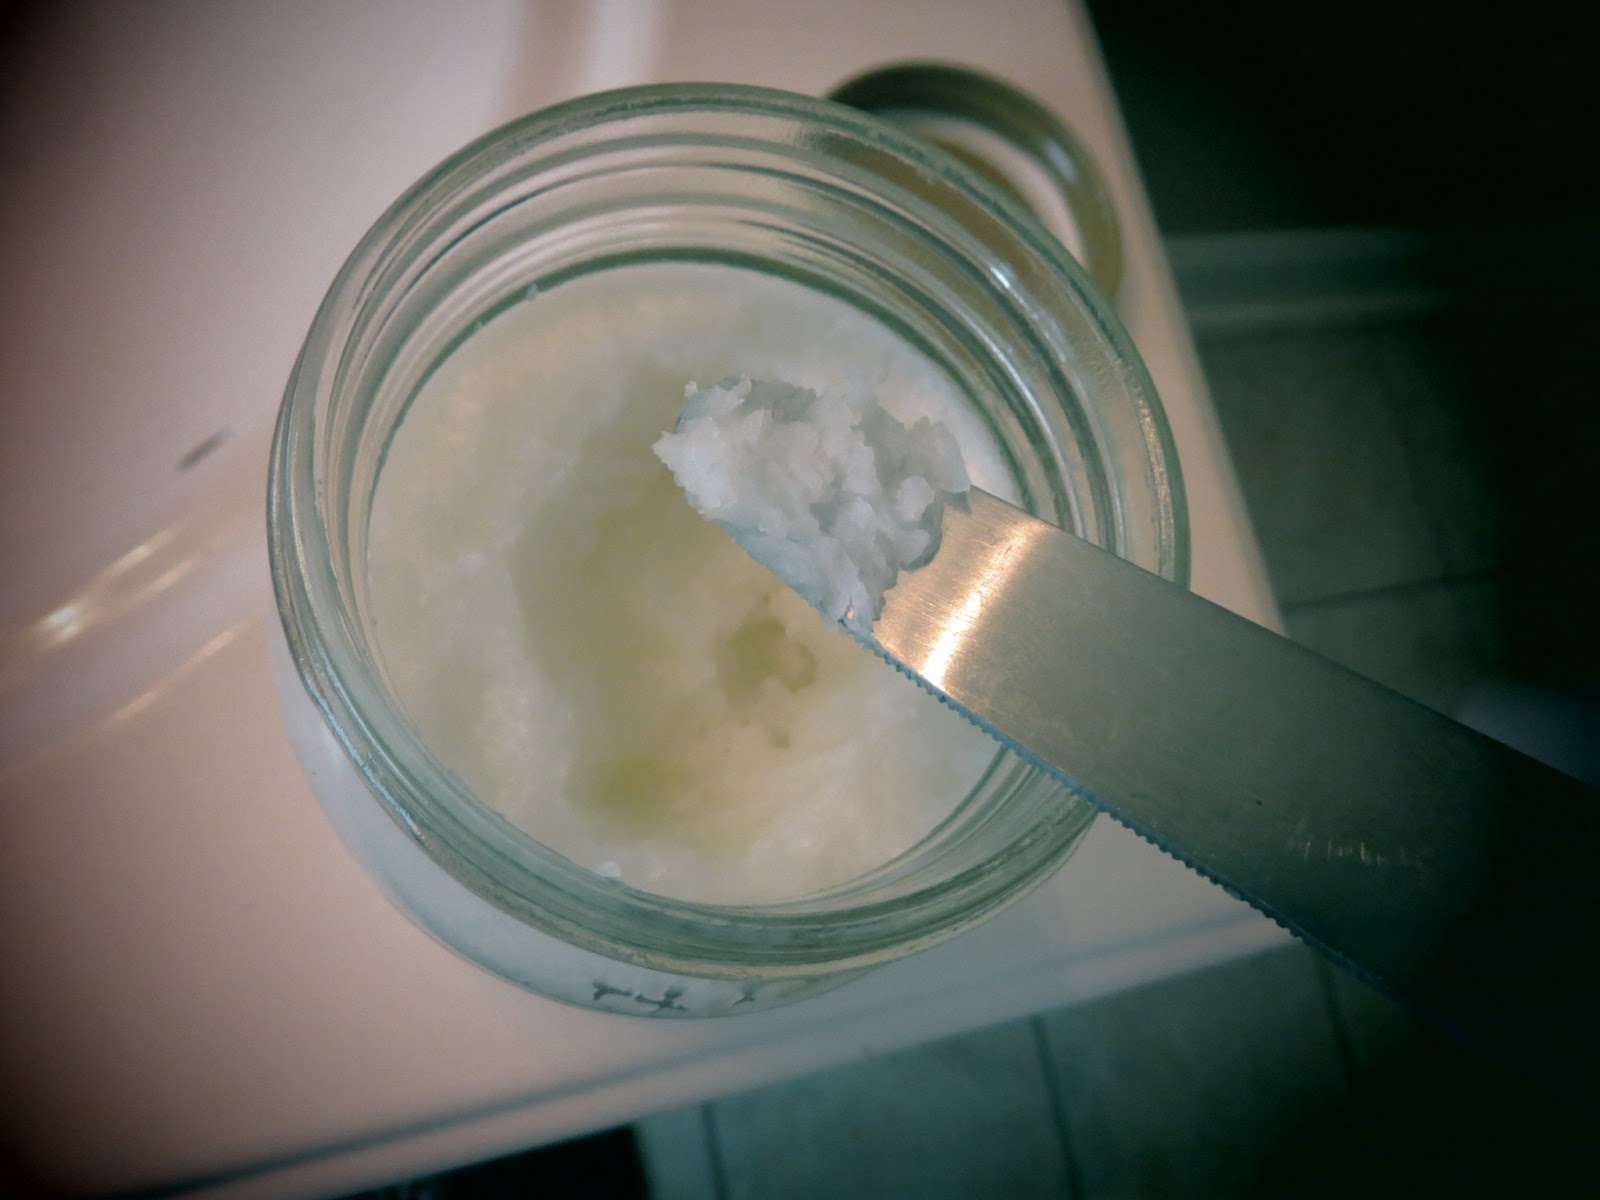
I suggest getting the stuff out with a knife or some such utensil 
to keep it as clean and versatile as possible. (Also, store it in a cool, dark place.)
Just get a little bit out at a time. Too much is going to make your head look greasy. My hair is long, curly, and course (like a classy Brillo pad) so I used a whole tip of a knife. If your hair is fine, start waaaaay smaller. Play around to find your perfect amount.


As soon as you put it on your hand, it starts melting. That shows you that it's not the worst of the saturated fats. . .but still.


Press your hands together until it completely melts.


Apply it to your hair. Start at the ends and work your way up. 


For Fine Hair: A larger amount can be applied to wet hair for an hour or so and washed out. (This is an especially good option for people with people with dry shafts of hair but greasy follicles who wouldn't be able to apply coconut oil to dry hair without weighing it down.)

For Curly Hair: Simply towel dry your hair. Apply a small amount of coconut oil and a small amount of hair gel (all-natural hair gel recipe coming soon). If your ends dry faster than your roots, apply a bit more oil to the ends. Scrunch your hair and shake it out a little. The coconut oil will naturally guide your strands into nice "piece-y" curls as your hair air dries. (Usually, I have to twist each lock into a curl and apply mounds of product.) Time saved: 15 minutes. The end.

Quick Fix: If you accidentally overdo it, get out your baking soda from when you made your own Laundry Soap and/or Dish Washer Soap and sprinkle it over whatever part of your head looks a little greasy. Brush it out until you don't see any more powder. Voila! (I have to do this on my bangs every once in awhile. Why do bangs get shiny when the rest of your head doesn't?? No idea. . .)


I washed and straightened my hair on Friday evening and applied it then. I only had to reapply a tiny bit on Monday morning (this skippidge of two mornings of reapplying product is unheard of in "Jessica'sHeadLand"). This picture is from Monday evening.

I know I just started doing this, but I was so impressed, I just had to blog about it. I am not sure, but if i had to hazard a guess, I think over time I am going to see fewer split ends and thicker hair. I'll have to report back in a few weeks.


UPDATE: Since that picture was taken, I actually did not have to wash my hair for an entire week and it didn't look oily or gross--even with FIVE hour-long cardio workouts that week! I washed my hair the following Friday, but didn't use shampoo, only conditioner--hoping that I could go "sulfate free" for the rest of my life. Unfortunately, by Tuesday night, my hair was feeling not so great, so I washed it with shampoo on Wednesday morning. 

My words of wisdom are: Until we can figure out a natural, thoroughly clean version of shampoo (I realize you can buy sulfate-free shampoo from the grocery store, and this may be your only option), I would advise washing your hair twice with shampoo before going without washing it for a week.

Tuesday, March 26, 2013

Make Your Own Dish Washer Soap

Why this is a good idea:

1. Cost Effective - In fact, if you have all the stuff from Making Your Own Laundry Detergent, then you only have to buy table salt, white vinegar, and lemon juice! (About $1.00 each, but you should have them already, because they are staples.)

2. Health Conscious - Think of all the dish soap you've consumed over the years. Companies fill soaps and detergents with supposed filler "inert ingredients" that doctors and scientists are constantly finding cause cancer and crap like that. With this recipe, the only ingredients you are accidentally ingesting are salts, vinegar, and lemon juice. 

3. Really Works! - It does. Basically, you make two mixtures: a powder one and a liquid one. 

Let's get started.


The Powder - Use equal parts Borax, Baking Soda, and Table Salt. You also need a small container to mix them in. I use a little fruit snack cup I got from Chick-fila one time.


(Some people on other websites combine all the ingredients and store them like that, but I have read a bunch of accounts that these ingredients harden together when left to their own devices. 
Mixing them each time isn't hard, so I do it. Do as the Spirit leads.)

**UPDATE** Since posting this, I have been using this detergent for a few months now, and have combined all three ingredients into one storage box. I haven't had them congeal yet, and I'm not sure why people have ever had this problem. Anyways, combining them is way easier than making this mixture every time.


The Liquid - Some bloggers claim that the powder mixture is enough to clean their dishes, but most sites have commentators freaking out because of this film all over their dishes. To alleviate the film issue, you need only two more ingredients: white vinegar and citric acid. Pour them in equal amounts into the rinse well of your machine. (One lady on one website used lemonade packets for the citric acid, but many readers complained that the lemonade turned everything yellow. 
Just use lemon juice, people!!!)

You can store these two liquids in one bottle and keep that bottle under the sink.


Your two mixtures go into your machine as follows:


The end. Your dishes come out like this:


I don't rinse my dishes particularly well or anything and have had just as much success, if not more, as I used to with Cascade. 

So there, "The Man"!!!


Costs of Things and Where to Buy Them:

1. Borax - $4.00 - Dollar General
2. Baking Soda - $0.50 - Aldi or Dollar General
3. Table Salt - $1.00ish - Aldi
4. White Vinegar - $1.00ish - Aldi
5. Lemon Juice - $1.00ish - Aldi
6. Small Container - Free - Chick-fila


Total: $7.50ish for months of detergent. 

Not swallowing harmful chemicals: Priceless.